 1. Burda Zip Front Shirt #8360
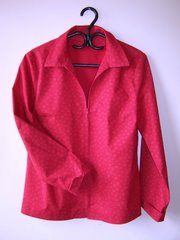
Down to the wire, and the final garment is almost finished! I thought I would add a picture, even though there are threads everywhere, wrinkles and still a few pins.
The red cotton shirt which so lovingly entered this life, has decided to be yet another difficult child, with much ripping out, and unsatisfactory behavior.
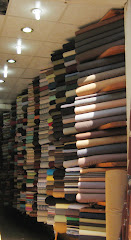
The fabric is a heavy quilting cotton, in a fabulous blue-red. I bought it near the beginning of the SWAP and never looked at again until last week. It has a slight overall print on the right side and I discovered that it is clear red on the wrong side -- what opportunities I missed for a reversible garment I will never know.
I promised myself I would be totally careful, not work when tired, and not whine and complain in my blog about the problems with this garment. BUT>>>>>>>
It seems I still have a lot to learn, even when being careful. I guess I should be glad I didn't choose silk or polyester for my final garment.
I have a new theory on sewing. If it works the first time, count your blessings. If it doesn't, you'll have to do it at least three more times.
- The cutting worked out splendidly.
- So did the marking, I even marked any curvy seam lines. Cotton is so great, takes markings, and in this case, no worry about anything showing through.
- The first interfacing (a light woven fusible) didn't stick, and the fabric bubbled even though the interfacing had been pre-shrunk. It pulled off easily, though.
- The second interfacing, a soft woven fusible whose name I forget, went on nicely, but seemed to have a lot of depth, soft but thick. I should not have interfaced both collar pieces, it is too fat.
- I had to move a bust dart, which should have been corrected on my pattern.
- The collar went together well.
- It only had to be sewn on twice.
- It was very difficult to fit the facings to the neck edge, especially around the shoulder seam. I always have a problem with this type of facing and hereby make a vow to never use them again. (This collar has no stand so it is sandwiched between the garment and the facings).
- I forgot to make the back neck facing deeper, so it fails to lie perfectly flat and looks pathetically home-made.
- The zipper proved almost as difficult as it did in slippery polyester in a previous incarnation. It is sandwiched between the facing and the front edges, and for some reason it is difficult to get everything to line up so the edges dont overlap or spread apart when the zipper is closed. You can't fit the zipper in place when the seam is basted together, so there is a lot of opportunity for the edges to slip out of place on top or underneath -- If I ever make this again, I will re-think totally how to do this. At least now I know that the zipper teeth have to exactly match the edge of the seam line.
- My machine is acting up, and refused to allow me to stitcheven one straight line of topstitching without a break, to stop and start again.
- The fabric is a heavy quilting cotton, in a fabulous blue-red, but it is actually too heavy for a shirt of this style. I bought it near the beginning of the SWAP and never looked at again until last week. It has a slight overall print on the right side and I discovered it is clear red on the wrong side --- what opportunities I missed for a reversible garment I will never know.
- I decided to create a pattern for a cuff on the sleeve, in a style I had never done before. On a scale of 1 - 10 the cuff comes off at about a 6.5. I will probably make a post-SWAP adjustment and just put a topstitched facing at the bottom of the sleeve.
- The sleeve caps did not cooperate, and had to be pinned a dozen times before fitting correctly -- even then, not the world's greatest job. Usually I don't have much problem with sleeves. Perhaps the stiffness of the fabric was involved. Maybe I just should have left it for a day or two.
- I followed someone's advice from an online hint, and sewed the sleeves before the side seams, approximately to the notches. This allows the sleeve to be "inset" at the bottom edge where it joins the side seam, which in my view, makes for a better fit and feel. Also, it's easier to finish the side seams this way.
- During pattern fitting, and in my previous shirt, the shoulder seams were ok. In this one, the right shoulder should have had a forward-shoulder adjustment. It's quite noticeable, but because I did not have the side seams sewed up, I missed it when working early in the construction. Too late to change it as the seams are finished and there's not enough fabric to make the move.
- The little vents at the bottom of the side seams, and the hem edges below the zipper worked out splendidly and neatly.
- I love this fabric color with my skin, but it will be warm for a long-sleeved shirt....most likely I will wear it unzipped with a light T or tank underneath.
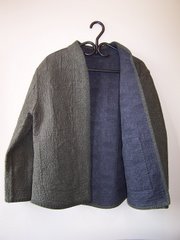
2. JEAN JACKET
For what seems like months, I have been trying to purchase snaps for my jacket along with a tool to put them on. All in vain. I have several kinds of snaps, and several tools bought and borrowed, but no combination that works effectively.
Finally in desperation, I bought one of those little silver things you pound the snaps on with, and snaps whose design is fine on top, but the unsnapped surfaces look clunky - picture later. I practiced. I found one of my tools would punch great holes. I measured several times. I put the snaps into the cuffs first....All went well.
Ready for the main row of front snaps, starting at the bottom. #1 snap went in well, right up to the point where I hammered my thumb holding onto that stupied silver bit of metal. Split the thumb and the nail, so spent the next 20 minutes with an ice cube.
Thankfully DH came to my rescue and pounded in the next 7 snaps, fashioning a holding device with a pair of pliers. With 3 more to go, the little plastic thingy that you pound into split into a dozen pieces.....so off I go again for yet another tool. It's spring!! I want to wear that jacket!!!


No comments:
Post a Comment