I appreciate that some of you still visit my blog, and may be wondering why nothing has been posted lately. Sadly, we lost our son, aged 31, on Nov 27, 2007 due to complications of surgery. Nothing has quite got back to normal since then...most especially my sewing passion.
Hopefully, once the holiday season is past and we can try to move on to another definition of "normal" I will get back to my machines and my various projects. Until then, thanks for your interest in my musings.
Betty
Sunday, December 30, 2007
Saturday, October 20, 2007
ThisWeek
 This beautiful fall weather has interfered with my sewing week. I actually got a sunburn sitting on the deck one afternoon. Today it is raining. We had a wild weather night, and one of my carefully piled woodpiles fell totally over in the wind. I guess wood-piling is not my strong suit.
T-shirts: Yesterday I managed to finish the two Jalie T-shirts and a skirt that had been waiting for hems. Knits still elude me, and the fit on these Jalie shirts is not perfect. I blogged about these fitting issues earlier.
Knit skirt: The skirt looks ok, but it has a wide (3.5" or more) contoured waistband at the top which I have decided is not flattering on me. The T-shirt stops about an inch above the band, drawing attention to the 'line' created near the hips. Still, it's nice to have a shirt and top that are the same -- a dress in effect.
New Project: Earlier in the week I cut out a 'test pattern' for Simplicity 3789, a princess seamed shirt, the view with the cross over front.

This is my first Simplicity B-C-D pattern. The fabric is from my stash, and is an ivory pashmina-type fabric whose composition I forget -- includes some rayon I think. I washed it, even though it says dry clean only. It's very soft, but seems to cling to itself, and will be a pain to work with as it tends to stretch every which-way. I spent a long time with the pattern making the required adjustments, hoping to turn this into a TNT shirt pattern, as there are several styles in the envelope. Mostly I just want to check the fit.
 Donna Karan Cape: My package from "The Sewing Place" came with the grosgrain I ordered for the Donna Karan cape. The color is not a perfect blend, and I am still on the fence about using it. Originally I thought navy would be best, but then figured it was too much contrast, so I ordered a burgundy color that I hoped would work. I need to consult someone with a better color sense than mine. At the moment I am leaning toward omitting the grosgrain completely. I still have not solved the problem of the arm opening, but I spent quite awhile experimenting with various options. I think I need to make this decision and get on with it.
Decision Made: I consulted with my husband, who has a great eye for color, and the grosgrain simply won't do. It has an orange cast to it, whereas the fuchsia wool has a definite blue cast. Navy ribbon looks great with it, so now my decision is whether to re-order grosgrain and wait for another 10 days to get it, or to forget the grosgrain completely. I guess my decision is NOT made after all.
Sunday, October 14, 2007
Reflections on a Sewing Plan #2
Speaking of reflections:

The last post has generated a bit of interest, so I thought I should round it out with a couple of previous points that have come to me since I started sewing again. In the past year-and-a-half I've learned and re-learned a mountain of stuff, and have tried to make planning part of my sewing passion.....not altogether successfully, I might add.
The following points, however I hope I have taken to heart:
Reflection #6: Stifle thyself. There will always be more fabric. There will always be another sale. I remember vividly my first visit to Fabricville after at least 20 years of not sewing. I was overwhelmed by the selection, and afraid the sale would end before I could make up my mind. At the same time, it hit me that all this variety, in its continuous seasonal rotations, had been here for the past 20 years while I was away. Even though I cannot resist sometimes, I now tend to wait a bit before I rush into a purchase with no immediate purpose.
Reflection #7: If you must stash, stash wearable colors. I am a "winter" by complexion, and I love bright colors. In the fabric shop, however, I tend to neutrals, which are safe and flexible, but which don't make the most of my coloring. Neutrals will always be available, but my favorite bright royal blue may not. The current fashion season seems to be very neutral. I wish I had some stashed prints in jewel tones. Even prints with the bright fuchsia's and turquoises that I am looking for also feature beige, yellow or orange, all of which make me look awful.
Reflection #7B: Don't buy orphans. This means a great piece of fabric must sometimes acquire a companion before leaving the store....unless it already has one waiting patiently in the 3rd suitcase under the spare bed. Mostly this idea just slows down the fabric addiction chemicals in the brain to a point where logic can prevail once more.
Orphans that other people give you are ok. You can use them as an excuse to go shopping for siblings for them.
Friday, October 12, 2007
Reflections on a Sewing Plan
Today I read a post about layering on Marcy Tilton's website. Three garments were suggested whose necklines fit together so that a shirt, vest, and jacket could be worn on top of one another (and presumably removed as temperatures dictate.) I've never been much for layering other than bringing a sweater if I think it's going to be cool, such as in air conditioned restaurants when traveling in the summer heat.

It's fall here now, and raining today. We heat our house with wood, and the fire has been on all night and all day for the first time this year. It's very hot in here, and I started my day in a long-sleeved t-shirt, a treasured gift from a friend who lives far away.
As I prepared supper, and sat later in front of the stove, I realized that a long-sleeved shirt is not routine apparel for me in the winter...at least not when I am at home. Then I realized that of all the shirts I have made in the past year or so, most have been long sleeved. I've only worn them when going out, or in the case of cotton shirts, as an over-shirt for cool days or unknown weather conditions.
Reflective Lesson #1: Sew what you will wear. Since I am home much of the time, I should sew what I will wear around the house, ie: short sleeved shirts, sleeveless shirts and tank tops.
Reflective Lesson #2: Think of layering. I should choose patterns that can be worn over the shirts above, as you would wear a sweater. Long sleeves with uncomplicated necklines and coordinating colors. There's a bit of opportunity here for some neat styles, and embellishments.
Referring back to Lesson #1, I think we all spend more time sewing what we won't wear much than what we will wear often. The challenge of more complex garments I suppose is a factor. Having made the Burda Cape/jacket, and I am considering making another. Does a person need more than one of these, especially when she is also making another cape by Vogue? A cape has a life-span of what? -- 3 years maybe, before the fashion police snatch it away.
More than one person has suggested red wool crepe would make a fabulous version of the Burda Cape. My sister, who is much more practical thinks one is enough...but then, she does not wear red.
 As I was reflecting on all of this, I was stretching my legs and feeling glad I had on my taupe stretch cords, made for SWAP last year. Suddenly, it occurred to me that I really love these pants, and also the brown ones I bought from Northern Reflections, and will probably also love the green ones waiting for hems and a 5-lb weight loss:
 Reflective Lesson #3: Sew what you will wear. I like stretch cords. Therefore, make more. I could/should make them in every pattern and color I can find. Make them in NAVY for heaven's sake. My potential SWAP has a navy base -- make it work. Good grief, if I can find the fabric, I could make them in fuchsia and see if I have the nerve to wear them. Other stretch fabrics might be just as great!
 Yesterday and today I worked on 2 Jalie T-shirts, trying to get the pattern adjusted for a good fit. Knits frustrate me, and I mostly still don't get them right. On the first round, the fit was tight because the fabric did not have quite enough stretch. I knew that would be the case, but figured my daughter could wear it. It was the sleeves that surprised me....so high, and so tight,...and so uncomfortable.
Rather than give up in despair (after I had already made copious notes about what to change on the shoulders and bustline) I impulsively chopped off the sleeves very short. Well! Now the shirt fits half-decently, the shoulders are not off nearly as much as I thought, and if I make that 5-lb weight loss, my daughter will not be getting a new shirt.
I enlarged the sleeves and lowered the armholes on the pattern by using the armscye of a larger size. It was moderately successful, but the forward shoulder adjustment still results in a strangely twisted sleeve. If you are still with me, I am getting to my reflection. It happened when I came upstairs to get out of the long sleeved too-hot shirt. An old black T-shirt from Reitman's was on the bed, and I put it on. It is made with a ribbed knit, a bit stretchier than the fabrics I have been using, but it fits perfectly -- even in the shoulders -- which is saying a lot because my shoulder seams are always too far back.
Reflective Lesson #4: If you have an old perfectly fitting shirt, take a pattern off it instead of fighting with alterations on other people's patterns. Duh.
Reitman's still carries this fabric and style of shirt, but they have changed their sizing, or perhaps the stretchiness of the fabric has changed. I have several of the old version. Best get to work tracing them off.
I should never have accumulated a stash. Now it takes forever weighing options about what to do with this or that. I read a post by Kathryn showing a princess style dupioni shirt. I decided to use my green dupioni for a similar pattern......decisions: short sleeve or long? muslin first or not? Is this really what I want for this dupioni? OK. Better make a muslin since you will have to do some alterations for sure, even though this is a Simplicity B-C-D cup pattern. Around we go again. What to use for the muslin? Junk fabric, decent cotton -- what will go with the potential SWAP. This is nice, but there are 2 whole meters. Never mind, use it anyway. Do I really want a short-sleeved shirt from this beautiful Asian cotton?........around and around.
Reflective Lesson #5: Sometimes you have to just do it. I muddle too much. There are no right answers, maybe not even any best answers. Pick a fabric. Pick a pattern.
Reflective Lesson #5A: If there is something #5 will go with, made or unmade, carry on. Use crappy stuff for a minimal fitting muslin and quickly get on with the fashion fabric that you really want to work with.
So there you have it, a rainy day's ramblings, and maybe some focus to very unstructured sewing of late. I hope this helps my progress.
Tuesday, October 9, 2007
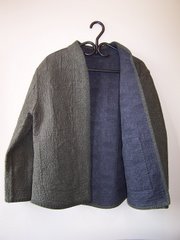
Jacket/Cape - Burda WOF - Aug 07, #111B
A late-summer sewing splurge found me enchanted with the cape/vest from the August Burda WOF. It's a very avant-garde fashion statement for me, but needed a change and a challenge.
The picture below shows the result, though I can now see it needs a good pressing!!
 My original intention was to make the jacket from red wool crepe, purchased for last year's SWAP, but never used. This green one was supposed to be a wearable muslin, to check out the sizing, then it became a major project in itself.
This garment was fun to sew, but has a bazillion little details that can be a thrill or a pain. The underlying vest is very comfortable, and suggests being used as the base for a jacket, adding sleeves from another pattern.
Process: I traced and pin-fit the pattern, and decided to sew it without any alterations. Usually I would lower the bust and lengthen the torso, but the bust seemed to fit well (besides, it's essentially behind the cape, isn't it?) and I was not too sure about how to lengthen the curved pieces of the cape. In retrospect, I should have stifled my urge to get going and thought this problem through.
So off I went, working with a piece of green faux suede, also bought for my last SWAP and not used. I only had about 1.5m of this stuff, not enough to make the unlined version with wide front facings, so I made the lined option, using a length of quilting cotton I had bought for a shirt. I decided it was too heavy for a comfortable shirt, but it had the exact green in it to match the Fashion Fabric. Killing two stash pieces in one fell swoop!
 The faux suede, which I had not sewn with before, was wonderful to work with, and of course, the cotton was no problem.
The Design: The pattern is essentially a princess seamed vest and the cape portion is seamed into the princess seam at the front.
No project would be complete without a litany of lessons learned and errors made:
- Being long-waisted, I really should have lengthened the whole thing. The belt is designed to come round slightly above the waist, and for me it is several inches above, so not all that comfortable. Lengthening the cape would required some thought, as a drop of 2" would increase the circumference quite a bit. It would be necessary to decide whether to do that, or to change the curve.
- Speaking of the belt: I made it too short (one should always actually measure the part around which the belt goes, then add for what will extend through the buckle). I also used a stiff woven interfacing in the belt. Not sure it was the best idea. I ended up having to add a piece to the center of the belt so it is not a fashion statement in any way. Fortunately it is not visible as it sits under the cape back. Nevertheless, a new belt is in order. Unfortunately, I do not have any fabric left. Every scrap was used.
- There is a lot of topstitching, and for the bit around the hem (the lining is seamed at the edge of the hemline) it might have been wise to baste rather than pin, or use a fusible tape to keep one layer from creeping more than the other around the curve. Since all the topstitching is not done at the same time, keeping track of stitch lengths and width from edge, and thread color is important.
- Working carefully: At the front where the cape joins the front pieces there is a very short of seaming below the slit for the belt. So there is absolutely no room for error in the hem or the placement of the belt slit. Personally, I would have left a bit more there for safety's sake. I had to pick out some stitching there and raise the belt slit a bit to make everything come out neatly. The belt slit starts exactly at the topstitching line around the hem edge. I am not sure what happens here if in the unlined version where the hem is turned up, but you have to leave room for it.
- There are a number of places in this construction where the mind has to conceive things inside out, upside down and backwards. My mind does not do this well. In particular, getting the lining installed was laughable as I struggled to figure out where to sew, what sides together, etc. I believe this is called "bagging" a lining, where the lining is constructed separately from the garment then all sewed in together, turned inside out by hauling through a shoulder seam or someplace equally narrow and inaccessible. There was a lot of scrunching up during this process, but it came out well in the end.
One thing I did right was to leave the final lining seam open until I was sure everything else was properly placed and I did not have to get back inside for anything. (In fact, the final side seam is still open, as I forgot to sew it up when doing the final touches today.) - Interfacing: Without pretesting on a scrap, I interfaced the collar, epaulets and pocket welts with a lightweight woven fusible. The result was pieces that resembled cardboard in their flexibility. (This was part but by no means the most critical factor in ruining the collar.) I was able to redo the shoulder decorations with a thin knit interfacing that left some movement. Otherwise they would not have bent enough to sew them down. I used the welts as they were since they did not require any movement once in place. (You must remember here that I was seriously out of fabric at this point.)
- I ruined the collar at the beginning. No need to go into details, just not paying attention and also using a too-stiff interfacing. I did not have enough fabric to make another, so my collar now matches the lining. This is not a particularly bad thing, just annoying.
- The neckline where the collar attaches is bulky. Both vest and cape join at the collar, so there is a lot of bulk there to deal with. This is in part due to the bulk of the chosen fabrics and collar interfacing. In another incarnation, I would be more careful about clipping and really ponder over the construction methods and fabric choices to try to reduce this.
- Lining with cotton: I chose the cotton lining for its color match to the suede. It is a bit heavy and un-slippery for a lining. I made this choice when I was still viewing this an an experimental garment. For best effect, I think this jacket should be made with collar and lapels made of the main fashion fabric. On the other hand, the cotton adds warmth, and it certainly adds an interesting element to the design.
- I messed up the buttonholes: Buttonholes are not my strong suit. This front has 6 large buttons in a double-breasted style. There are some other little details around the button layout, but I was again not as careful as necessary and misplaced the center buttonhole by 1/4", leaving insufficient space for equally spaced buttons at the top. Though I do not expect to wear this garment with the top closed up to the neck, it would have been nice to have done it right. I need to get over my fear of getting the buttonholes looking good and properly placed. Practice. Practice. Practice.
Monday, October 8, 2007
Donna Karan Cape - Day 3
The back of the cape is completed:
 This morning I worked on the back of the cape, as it is the only bit that can be done without making a decision about the armhole openings in the front. I think I'm doing a bit of overkill on this project, considering it was an impulsive pattern purchase. Apart from the color, the fabric is only so-so. Fabricville $24.99/m on sale for half price last week.
I pressed the darts, basted the organza in place, and after much-much-much experimenting with needle size, tension and presser foot pressure, finally got my machine to stitch reasonably well through the 2 thick interlined pieces of fabric. I'm still not happy with how my machine is sewing, even after a tune-up last week. It is possible, I suppose that it is my problem and not a technical one. There's a lot I don't know about both organza and sewing heavy fabric.
 Photo shows the back seam edges, ready to be joined. That seam is now sewn, pressed and awaits a binding of some sort. I did not topstitch, as I need to be sure it will look right, and will have to experiment further, perhaps with some heavier thread.
Part of the Grosgrain decision is made:
I received a helpful email from Susan in my sewing group, enlightening me about the difference between grosgrain and Petersham.
"There are 2 types of Grosgrain ribbon. The one that you can buy in Saint John has a straight edge and I expect that the one you need has the little picots and will shape around curves (also called Petersham). "
Of course, Petersham is what I need, and of course, it is not available locally. Nonetheless I have decided to trust the designer's design, and use this trim down the front edges, collar and pocket flaps. (The pattern instructions refer to it as "grosgrain." I am so pleased to know there is more than one version of this.) I had seen grosgrain in a multitude of colors at The Sewing Place website, and sure enough, it specifically explains that it is Petersham. Hopefully the color I ordered will work. Waiting for this to arrive will give me a good reason not to become obsessed about getting this garment finished, and to tackle a couple of other in-progress items.
Armholes still on hold:
Having decided on the grosgrain trim, and on not having raw edges anywhere, still leaves the arm openings undecided. I quote the dilemma from an (edited) post I made to the Stitcher's forum a few days ago.
"The part that confuses me is the arm openings in the front.
Grosgrain ribbon is stitched along left and right sides of the slash line on the right side of the front fashion fabric. (edges of ribbon line up with slash line). The FF is then slashed.
A separate elongated oval piece of FF, called the "applique" piece is laid on top and a narrow rectangle is stitched along the edges of the slit and across the 2 ends through the ribbon and the front. The applique piece is then slashed down the middle of this narrow rectangle. The (raw) outer edges of the oval are then stitched down. There are no instructions to finish the slash edges in any way.
So we have, from the underneath up: front FF, slashed with raw edge; grosgrain on top of each side of slash; applique FF on top with raw edges slashed and unfinished outside edges of the oval stitched down.
In the pattern photo the grosgrain is clearly visible in the arm opening. I am at a loss to fathom how it becomes visible from underneath the applique piece. There is a traditionally constructed welt pocket elsewhere on the cape. I wondered why the arm openings were not similarly designed....but then, I'm not the famous designer, am I. It seems to me if the applique were turned to the wrong side before stitching it down, the opening would be finished (similar to the welt for the pocket and the grosgrain would be visible. This is what the photo looks like, but the technical drawings show the applique on the right side.
I usually get into trouble when I try to change pattern instructions that I think are inadequate, so I am trying to be more careful to do as I am told in the hopes of getting a better and/or easier result."
I already tried a sample flipping the applique piece to the back, as in a welt, but my FF is too heavy for that.. It would work, I think, using a lighter weight fabric for the welt. Something will pop up in my mind, or someone else's sooner or later.
Next steps will be to
- baste the organza on the other cape pieces,
- look for a suitable lining fabric. The pattern is not lined, so there may be some creative design required around the facing to make the lining fit correctly and still allow access to the arm opening.
 find a fabric of a lighter weight but the same color (good luck to me) for the front facings. I think my fabric is too heavy for a facing, creating too much bulk at the collar and at the hem.

Sunday, October 7, 2007
Donna Karan Cape -- Day 2
Thanks to my daughter-in-law (who is preparing our Thanksgiving Dinner) I have been able to spend much of this day sewing. The cape is cut out and well meditated over. The pattern called for 2 meters, but I have enough leftover for a slightly A-line, knee-length skirt if I piece the belt for the cape. How great is that!
I tried some very soft knit fusible interfacing on a sample, and vetoed that idea. Even though it was very light, it made the wool much too stiff. Also, the fusing process is just too iffy...potential for bubbles, twists, and a flattening of the nap on the 'right' side due to too much steam and heat.
 Instead, I decided to interline with silk organza. At this point the organza is cut and pinned onto the cape pieces. Now I have never done this before, and I don't even know if it is an appropriate use of silk organza, but on the back cape piece it seems to add a bit of body to the garment without changing the nature of the face of the fabric. I think it will also add a layer of warmth. It's not pretty, so I'm still looking for a suitable lining.
Dinner is being served at my dining room table, so I had to finally stop the sewing and clear things away for what promises to be a magnificent supper.
I have not solved the issue of the arm hole slits and their "applique" piece. I did a quick sample done as a bound buttonhole, and my fabric is too thick to do that well. The binding would have to be something less weighty.
I am pondering using a fabric that will allow raw edges. Perhaps ultra-suede, though I've never even seen it. I have also not resolved the grosgrain edge and button hole trim. I have none to play with, so that will be for another day.
 Tomorrow I will hand baste the organza onto the back pieces, decide on an inside seam finish (maybe none since it will be lined) and sew up the back seam, topstitching on both sides of the seam line. I tested that and it looks great. I will also eventually do the shoulder/side seams the same way.
This is a thick fabric, so I am a bit worried about bulk at the collar/neckline...but that will come in its own due time.
Happy Thanksgiving fellow Canadians.
Saturday, October 6, 2007
Donna Karan Cape Vogue 2924 - Beginning
 Tonight I checked out the pattern and laid it on the fabric.
The fuchsia wool is a blend, including some acrylic and something else which I temporarily forget. I pre-treated it with Eucalan, which softened it quite a bit. It drapes nicely, but seems to have the potential to stretch out of shape. for this reason, I think I will interface all the pieces with a soft knit interfacing, and line the cape with silk. This will make a totally luxurious cape, which should hold its shape well. Silk should add some warmth, and it will be wonderful to slip on. So I'll have to find some silk somewhere, hopefully in a navy/fuchsia print.
I now have to make some other decisions to make:
- Exposed Raw Edges: The pattern is intended to be made with melton, which I presume can handle raw edges. The instructions are a strange blend of seam edges finished with bias tape and raw edges top-stitched down on the outside. These raw edges include the shoulder/side seams and the collar/neck seam. This does not appeal to me, so I will sew the seams in a conventional manner, possibly top-stitching on the outside.
- Similarly, the armhole slits are unfinished, and an "applique" piece surrounding the slit is topstitched onto the right side, with exposed raw edges. This seems totally tacky to me, and I think the slit should be created similarly to a bound buttonhole.
- Grosgrain trim: The front edges, collar edges , armhole slit and pocket flap are trimmed with grosgrain ribbon, which is applied in an interesting fashion which needs some practice pieces before a final decision about whether to apply it or not. Doing so depends on acquiring grosgrain in a suitable color. It would have to be either fuchsia or navy. Not sure I can find it locally, so I will have to check out sources for 5/8" grosgrain.
- I've never used grosgrain, so I'm not sure if it will look cheap. My reading of the instruction pictures the grosgrain sandwiched between the front and the facing, and extending out about 1.4". The grosgrain is attached to both the outer and under collar, so there are 2 bits extending at the top edge of the collar. I am not sure why this should be the case, but it is. It would be interesting to follow the directions and see the outcome. Unfortunately, there is no changing the mind after the fact without a lot of ripping out. The options would be no edge treatment, a bias binding using the lining fabric or a sturdy plain fabric, or stitching on a piping. Piping would require a hem facing I think.

- The buttonholes of this pattern are also trimmed with grosgrain, then a raw-edged rectangle of Fashion fabric is stitched on either side of each buttonhole. I rather like the effect, but I'm not sure about the sewn-on bits of fabric, and I'm not sure that without them the grosgrain will look classy enough for the design of this cape. Leather would look terrific, but I've never used leather, and would likely ruin the whole thing. So perhaps no special buttonhole trim would be in order. Maybe make bound buttonholes and select some special buttons.
- The bottom edge: The bottom edge of the cape is also unfinished...just cut with pinking shears. I have to say, this was the first thing I noticed when I read the pattern directions, and I was disappointed as I thought a Donna Karan design would have some classy finishing. At the very least, I expected that the pattern would offer options for fabrics that would not take well to a pinked edge. I have decided to add 5/8" to the bottom edge, and to do a HongKong finish on the hem.

SWAP 2008 - To Sew or Not to Sew, that is the Question
I see the excitement building on the Stitcher's Forum around the latest version of Timmel's SWAP contest. SWAP was a great learning experience for me last year, but toward the end, I was not very happy with myself working under the stress of a time limit. At that time, I vowed not to participate next time......then I began reading posts, and, well.........
I'm still undecided, but I have, as is outlined in my previous post, been working toward coordinated clothing items. I have almost enough for a SWAP in my NAVY category, and one garment is already made, and one is almost finished. The disadvantage is that I have my "print" as a bottom. The navy with small silver stripes looks great as a skirt and pants, but may not take well to a print top, leaving me in a more difficult planning position than if I had chosen a print top.
Somewhere I read that to look stunning, dress in all one color, including hose, shoes and purse, and wear a jacket of another color. Sounds good to me, so I'm going with that theme as I move into this navy/grey wardrobe. At this point it does not fulfill SWAP criteria particularly, but if I can get these bits working, I'll have enough to make a SWAP out if the result.

 My "stunning" jacket will be a fuchsia wool cape, (Donna Karan - Vogue 2924) designed for outdoor wear, so there will also be a scarf of a similar color, or another light-weight jacket to set off the outfits when worn indoors.
This pattern will be a challenge as there are some very unusual directions, such as raw edges where the collar joins the neck edge, which I will have to work through to my satisfaction. I hope to document the garment as I cannot find it reviewed anywhere.
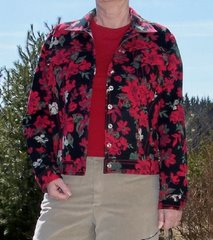
The navy and blue-grey show up decently here, but the white in the background is actually more grey than it looks, and the blue on the right goes better than it looks with the navy. In between the 2 silver stripes, there is a line of a lighter blue. The fuchsia would not photograph well, but you get the idea perhaps.
 So my 2 monochrome outfits to contrast with the fuchsia cape are:
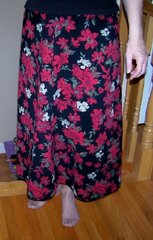
Navy/silver stripe pants and skirt; navy light-weight knit short sleeve top or tank style; navy cuddly knit long sleeve top. This skirt is already made.
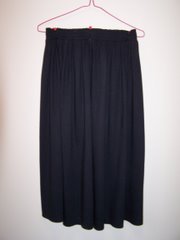
Heathery blue-grey knit pants and skirt; same fabric top so it looks like a dress when worn together. The skirt is underway, the top is cut out, but I think it is too small a size, so I will make it up for my daughter, and try again.
These 3 tops, along with a light grey sparkle knit all go with both sets of bottoms.
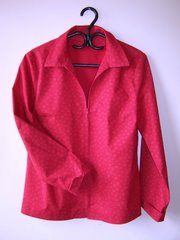
 I also plan a white fitted shirt (first try at a Simplicity 3684 B-C-D pattern) to wear with the navy bottoms, and a chiffon shirt in a grey/white/blue print to wear with the blue-grey bottoms.
None of this includes a purchase from Julie, and I am thinking of the blue wool denim as a possible 'indoor' jacket to pair with both, but I have lost my swatch, and need to track it down before making that decision.
Last time I spent far too much time with planning and re-planning the fabrics and colors. This time, should I decide to take up the challenge, I will stick with my first instincts as much as possible and get on with it.
One lesson I learned, however, is that the styles and fabrics have to work together in all combinatons, so there can't easily be a combo of dressy and sporty. I think I am working toward a mid-range -- clothing for shopping, travelling and visiting. Using the same fabric for pants and skirt introduces a bit of boredom, but also some versatility to dress up a bit when required.
I'm still undecided, but I have, as is outlined in my previous post, been working toward coordinated clothing items. I have almost enough for a SWAP in my NAVY category, and one garment is already made, and one is almost finished. The disadvantage is that I have my "print" as a bottom. The navy with small silver stripes looks great as a skirt and pants, but may not take well to a print top, leaving me in a more difficult planning position than if I had chosen a print top.
Somewhere I read that to look stunning, dress in all one color, including hose, shoes and purse, and wear a jacket of another color. Sounds good to me, so I'm going with that theme as I move into this navy/grey wardrobe. At this point it does not fulfill SWAP criteria particularly, but if I can get these bits working, I'll have enough to make a SWAP out if the result.

 My "stunning" jacket will be a fuchsia wool cape, (Donna Karan - Vogue 2924) designed for outdoor wear, so there will also be a scarf of a similar color, or another light-weight jacket to set off the outfits when worn indoors.
This pattern will be a challenge as there are some very unusual directions, such as raw edges where the collar joins the neck edge, which I will have to work through to my satisfaction. I hope to document the garment as I cannot find it reviewed anywhere.
The navy and blue-grey show up decently here, but the white in the background is actually more grey than it looks, and the blue on the right goes better than it looks with the navy. In between the 2 silver stripes, there is a line of a lighter blue. The fuchsia would not photograph well, but you get the idea perhaps.
 So my 2 monochrome outfits to contrast with the fuchsia cape are:
Navy/silver stripe pants and skirt; navy light-weight knit short sleeve top or tank style; navy cuddly knit long sleeve top. This skirt is already made.
Heathery blue-grey knit pants and skirt; same fabric top so it looks like a dress when worn together. The skirt is underway, the top is cut out, but I think it is too small a size, so I will make it up for my daughter, and try again.
These 3 tops, along with a light grey sparkle knit all go with both sets of bottoms.
 I also plan a white fitted shirt (first try at a Simplicity 3684 B-C-D pattern) to wear with the navy bottoms, and a chiffon shirt in a grey/white/blue print to wear with the blue-grey bottoms.
None of this includes a purchase from Julie, and I am thinking of the blue wool denim as a possible 'indoor' jacket to pair with both, but I have lost my swatch, and need to track it down before making that decision.
Last time I spent far too much time with planning and re-planning the fabrics and colors. This time, should I decide to take up the challenge, I will stick with my first instincts as much as possible and get on with it.
One lesson I learned, however, is that the styles and fabrics have to work together in all combinatons, so there can't easily be a combo of dressy and sporty. I think I am working toward a mid-range -- clothing for shopping, travelling and visiting. Using the same fabric for pants and skirt introduces a bit of boredom, but also some versatility to dress up a bit when required.
Monday, September 17, 2007
Wardrobe Review - Thinking of the Top Ten
Summer interfered with my sewing, but now that fall weather is returning, I am more inspired to check out the latest fashions and try to reduce my stash.
I finished the turquoise sleeveless shirt, and I finished the bias tank top mentioned previously. I tried the tank pattern on a piece of strange white cotton with something imprinted on it, but it was far too stiff for the pattern, so will likely not be completed.
I am still waiting to complete the buttons and hems on the Athena blouse and a pair of green stretch cords that were sewn early in the summer. Hot weather did not inpire completion of those, but they will make nice additions to the fall wardrobe.
I need a nice ivory or olive top to wear under the Athena, a tank or a short sleeved T-shirt in a very thin knit, as the shirt is long-sleeved and quite a heavy cotton. I am usually too warm, so I need to be able to take it off.
TOP TEN
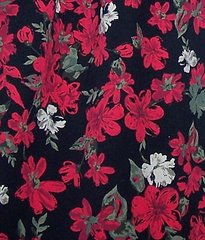
Why the red print, you ask? There is a thread on Stitchers which is of interest to me in organizing my wardrobe:
Ten items to make your wardrobe flexible has members working out what they need to enhance their current wardrobe What a great idea! In spite of a completed SWAP, I still find myself with orphans -- shirts with no bottoms, bottoms with no tops, and occasions with no suitable attire.
The first post on this thread lists Tim Gunn's 10 essential wardrobe components as best remembered by those watching his new TV show.
So as I go through my planning and dreaming, I want to keep this in mind. I have only been sewing for about a year and a half, and I think I have a pretty extensive stash....though not like that of many people whose blogs and posts I read. In my stash are inheritances from my daughter who sewed for college 10 years ago, a few quilting cottons bought on sale to make shirts (some of which are too heavy for shirts I have discovered -- and too wrinkly for skirts), assorted knits for t-shirts, a few nice fabrics bought (mostly from Timmel's) just because I liked them, and a collection of 7 or 8 pieces of silk bought randomly when I was inspired to try silk.
I would like to reduce this stash, but a careful review finds me short on coordinating pieces. So that's my goal now...to use up as much as I can of what is here, and only purchase what is needed to bring the whole stash to life. The planning is underway, but gets very fuzzy.
1. The Olive/Ivory Collection: I started stash-reduction with the Athena blouse (in ivory and green print) and the olive green pants. The corduroy was purchased in preparation for my SWAP, but not used The print was a wild piece from my daughter. The pants go with a few of my SWAP items, so there's a real bonus there. To round this out, as I mentioned above, I need a matching olive (or ivory) T-shirt or tank to wear under the shirt.
For my SWAP I also purchased some green faux suede, which I have now combined with one of my quilting cottons into a lovely cape/jacket from the August Burda WOF. A delightful project which I will document (hopefully) one day soon.
Unfortunately, the greens of the pants and the cape don't go together well, but I have fabric on hand to make taupe pants to coordinate with the cape, and if I make an ivory or olive turtle-neck, it will go with both. (My friend Wendy will be cringing here, as she is trying desperately get me into more "winter" colors -- which I love the best, but seem to end up more earthy in spite of myself)
I found in my stash a great length of drapy olive knit that matches the cape perfectly. It's rather ugly I think, a Wazoodle impulse purchase. However, it just might make a decent dress or skirt & top if I make it on the crosswise so the stripes are vertical.
2. The Navy/Grey Collection: In a new direction, I used a dark navy with silvery stripes to make a pencil skirt from the sloper we made in my sewing group. It turned out beautifully so far -- just needs hem and waistband. The fabric was from my daughter's stash. Looks like wool but acts like polyester. I interlined it, for some reason thinking this would be easier than making a lining. Where was my brain? Nonetheless, I think it's going to be a nice-looking addition to the wardrobe. I never liked 'straight' skirts, but maybe I just never had one that fit.
There is a lot of this fabric left, so I will make navy striped pants (and line them conventionally) to take advantage of the collection of coordinating tops.
For the proposed tops, I purchased some nice knits on sale at that: a blue-grey jersey that I think is polyester. It feels wonderful and keeps its shape. I took a chance and did not pre-wash it, so I could be in for a disappointment down the road. (I have had such bad experiences with knits in the washing machine that I decided to take a risk. This may come back to haunt me -- meanwhile I will have lovely looking garments till they need washing)
Last night I cut out a flared skirt and a T-shirt from this jersey. This will give the effect of a DRESS which is surely a Top-Ten Item in anybody's list, but which I do not own at the moment.
Also purchased was a thick cuddly navy knit for a long-sleeved cozy shirt to match the pants, and a light weight, sparkly knit in a very light grey for some sort of T-shirt top. As a remnant, I picked up a navy, very thin knit, suitable for some sort of top, just not sure what yet. The two navy tops should be ok with the jersey skirt.
I have other navy-related items in my stash, and also a grey for pants -- not sure how it will all coordinate, but another cape-jacket in denim comes to mind if the colors match.
3. The Brown Collection
This will be for later.
I finished the turquoise sleeveless shirt, and I finished the bias tank top mentioned previously. I tried the tank pattern on a piece of strange white cotton with something imprinted on it, but it was far too stiff for the pattern, so will likely not be completed.
I am still waiting to complete the buttons and hems on the Athena blouse and a pair of green stretch cords that were sewn early in the summer. Hot weather did not inpire completion of those, but they will make nice additions to the fall wardrobe.
I need a nice ivory or olive top to wear under the Athena, a tank or a short sleeved T-shirt in a very thin knit, as the shirt is long-sleeved and quite a heavy cotton. I am usually too warm, so I need to be able to take it off.
TOP TEN
Why the red print, you ask? There is a thread on Stitchers which is of interest to me in organizing my wardrobe:
Ten items to make your wardrobe flexible has members working out what they need to enhance their current wardrobe What a great idea! In spite of a completed SWAP, I still find myself with orphans -- shirts with no bottoms, bottoms with no tops, and occasions with no suitable attire.
The first post on this thread lists Tim Gunn's 10 essential wardrobe components as best remembered by those watching his new TV show.
So as I go through my planning and dreaming, I want to keep this in mind. I have only been sewing for about a year and a half, and I think I have a pretty extensive stash....though not like that of many people whose blogs and posts I read. In my stash are inheritances from my daughter who sewed for college 10 years ago, a few quilting cottons bought on sale to make shirts (some of which are too heavy for shirts I have discovered -- and too wrinkly for skirts), assorted knits for t-shirts, a few nice fabrics bought (mostly from Timmel's) just because I liked them, and a collection of 7 or 8 pieces of silk bought randomly when I was inspired to try silk.
I would like to reduce this stash, but a careful review finds me short on coordinating pieces. So that's my goal now...to use up as much as I can of what is here, and only purchase what is needed to bring the whole stash to life. The planning is underway, but gets very fuzzy.
1. The Olive/Ivory Collection: I started stash-reduction with the Athena blouse (in ivory and green print) and the olive green pants. The corduroy was purchased in preparation for my SWAP, but not used The print was a wild piece from my daughter. The pants go with a few of my SWAP items, so there's a real bonus there. To round this out, as I mentioned above, I need a matching olive (or ivory) T-shirt or tank to wear under the shirt.
For my SWAP I also purchased some green faux suede, which I have now combined with one of my quilting cottons into a lovely cape/jacket from the August Burda WOF. A delightful project which I will document (hopefully) one day soon.
Unfortunately, the greens of the pants and the cape don't go together well, but I have fabric on hand to make taupe pants to coordinate with the cape, and if I make an ivory or olive turtle-neck, it will go with both. (My friend Wendy will be cringing here, as she is trying desperately get me into more "winter" colors -- which I love the best, but seem to end up more earthy in spite of myself)
I found in my stash a great length of drapy olive knit that matches the cape perfectly. It's rather ugly I think, a Wazoodle impulse purchase. However, it just might make a decent dress or skirt & top if I make it on the crosswise so the stripes are vertical.
2. The Navy/Grey Collection: In a new direction, I used a dark navy with silvery stripes to make a pencil skirt from the sloper we made in my sewing group. It turned out beautifully so far -- just needs hem and waistband. The fabric was from my daughter's stash. Looks like wool but acts like polyester. I interlined it, for some reason thinking this would be easier than making a lining. Where was my brain? Nonetheless, I think it's going to be a nice-looking addition to the wardrobe. I never liked 'straight' skirts, but maybe I just never had one that fit.
There is a lot of this fabric left, so I will make navy striped pants (and line them conventionally) to take advantage of the collection of coordinating tops.
For the proposed tops, I purchased some nice knits on sale at that: a blue-grey jersey that I think is polyester. It feels wonderful and keeps its shape. I took a chance and did not pre-wash it, so I could be in for a disappointment down the road. (I have had such bad experiences with knits in the washing machine that I decided to take a risk. This may come back to haunt me -- meanwhile I will have lovely looking garments till they need washing)
Last night I cut out a flared skirt and a T-shirt from this jersey. This will give the effect of a DRESS which is surely a Top-Ten Item in anybody's list, but which I do not own at the moment.
Also purchased was a thick cuddly navy knit for a long-sleeved cozy shirt to match the pants, and a light weight, sparkly knit in a very light grey for some sort of T-shirt top. As a remnant, I picked up a navy, very thin knit, suitable for some sort of top, just not sure what yet. The two navy tops should be ok with the jersey skirt.
I have other navy-related items in my stash, and also a grey for pants -- not sure how it will all coordinate, but another cape-jacket in denim comes to mind if the colors match.
3. The Brown Collection
This will be for later.
Friday, July 13, 2007
Vogue 2875 - Bias Garments
I've been spending time with summer photos of our lovely wildflowers and waterways, hence sewing time is a bit less than usual. I think I am up to 4 or 5 summer UFO's now. Waiting for buttons in some cases, and inspiration in others.
I did finish one item though -- a tank top from Vogue 2875 by ADRI. It was designed on the bias, and I must say, I think I am now convinced all such woven tops should be bias. The drape is lovely and just feels good. My top is a wearable muslin of bargain wall probably-polyester print.
This is a wardrobe pattern (tank, jackets, skirt and pants) which was featured in the Vogue summer magazine. The envelope itself is totally uninspiring, (even less so than the online picture above) and I would not have given it a second glance if not for the magazine feature. The jacket and skirt are also a bias cut, and I am excited to see how the bias affects the way the jacket hangs.
It's a loose fitting pattern, and so breezy and comfortable for summer. The armholes and neckline are meant to be faced with bias strips, but I cut a one-piece shaped facing for the front and one for the back -- an experiment to learn how to line the top in "reversible" fashion. My next version of this will be silk chiffon, underlined lined with something really thin, -- batiste or light silk lining and I will try the bias binding on the armholes and neck edges.
I needed a number of alterations, but the tank top was a simple place to experiment with an FBA, moving darts and taking in the front neckline. I think I've finally figured out what is required for these alterations on other patterns.
Things I learned:
Balancing comfort and style:
I'm not sure about the style. It is incredibly comfortable to wear, but does not really have any definition at the waist. Thus, it covers various rolls very well, but really does not look too chic.
I did finish one item though -- a tank top from Vogue 2875 by ADRI. It was designed on the bias, and I must say, I think I am now convinced all such woven tops should be bias. The drape is lovely and just feels good. My top is a wearable muslin of bargain wall probably-polyester print.
This is a wardrobe pattern (tank, jackets, skirt and pants) which was featured in the Vogue summer magazine. The envelope itself is totally uninspiring, (even less so than the online picture above) and I would not have given it a second glance if not for the magazine feature. The jacket and skirt are also a bias cut, and I am excited to see how the bias affects the way the jacket hangs.
It's a loose fitting pattern, and so breezy and comfortable for summer. The armholes and neckline are meant to be faced with bias strips, but I cut a one-piece shaped facing for the front and one for the back -- an experiment to learn how to line the top in "reversible" fashion. My next version of this will be silk chiffon, underlined lined with something really thin, -- batiste or light silk lining and I will try the bias binding on the armholes and neck edges.
I needed a number of alterations, but the tank top was a simple place to experiment with an FBA, moving darts and taking in the front neckline. I think I've finally figured out what is required for these alterations on other patterns.
Things I learned:
- The bias garment tends to stretch a bit in the wearing, slightly lowering the neckline which is barely above the cleavage. For the sake of modesty and a pre-existing tan line, I will raise the neckline just a bit next time.
- The pattern is quite short, and I needed to add a bit more than usual to have it long enough at the waist.
- Angled darts (from just above the waist) are much more attractive and comfortable than horizontal ones.
- The original pattern has no darts, but the FBA resulted in a substantial dart. I drafted a version with no darts, following directions here (thanks to Julie Culshaw for the reference) but based upon paper-fitting, I don't think it will hang comfortably, but I might give it a try anyway if I can find the right remnant.
Balancing comfort and style:
I'm not sure about the style. It is incredibly comfortable to wear, but does not really have any definition at the waist. Thus, it covers various rolls very well, but really does not look too chic.
Friday, June 29, 2007
Caught in the Call of Summer
I've not stopped sewing since SWAP, but other summer activities have got in the way of blogging. At the end of the season I think I will make up a collage of all my projects, and make the comments in one fell swoop.
So far I have completed, or almost completed several items, many from stashed fabric. This is not to say I have not added to the stash. A local quilt shop had their annual sale, and I bought 8 pieces of garment size -- lovely cotton prints, hopefully for summer wear. Then there was the Wazoodle order, though I must learn that from them you get what you pay for, and stop buying bargain priced stuff. And of course, Fabricville is having their 3 for 1 sale which resulted in some nice soft swiss dot which is becoming a sleeveless blouse today or tomorrow.
And I visited Silver Silk in Halifax for a couple of lovely pieces for my pending silk spree, which has not yet started. First off will be some nice One-Seams I think, in a blue between navy and royal. I re-measured and re-cut my pattern, and did a muslin in cotton. For the silk, I want a perfect fit, or as near as possible. I put French seams in my muslin, and it seemed to work fine.
The summer so far:
- the olive corduroy pants previously posted Burda WOF #120 April 07
- ivory fleece Saf-T-Pockets Rochelle jacket (no pockets though) completed, started during SWAP as a muslin
- navy/purple linen pants Burda WOF #120 May 07?
- One-Seam pants from a blue-green-plum batik cotton
- Athena blouse from olive/ivory far-out print
- blue linen empire waist tunic top with embroidery around the neck. NL?
- cotton print empire waist top - not a great fit. Decided I don't like empire waist styles so will not further modify the pattern.
- pink knit sleeveless top - nice pattern but cheap material - don't like knit styles with facings, at least not with V-neck. May investigate this further for possible double front to avoid facings.
Friday, April 27, 2007
Post-SWAP: Where Do We Go From Here?
 Post SWAP update: April 18, 23, 26, 27.
[For the SWAP click here]
It's April 18. What's been happening since SWAP?
It's been a while since I posted. I have done a little sewing, but mostly I've been doing some planning for the next phase.
I have ruined one attempted top of ivory panne velour. It turned out too small. Not enough stretch for the pattern. No great loss.
I have completed the unfinished muslin jacket of ivory Malden Mills fleece. It still needs pockets, or some sort of embellishment, but it is wearable. I used bathing suit lining for the binding, but I didn't do a great job of it. It's cuddly stuff -- the fleece, not the binding -- and feels good on these cold damp April days we're having here. Good enough for around the house, or walking in the evenings. I made it to have something visible for walking at night.
I also started some of the touch-ups required on my SWAP garments:
- The One-Seams got taken in, and I did that yesterday. They were too low in the crotch, and the legs too full. The fabric is quite heavy. I took in about an inch all the way up the leg seam on both sides.
- The red shirt cuffs do not feel right, so I'm taking them off and putting a facing on the outside of the sleeve bottom instead, and
- the pockets of my reversible jacket really should be removed, and get binding all around instead of having the bottom edge turned under. An oversight at the time while rushing. None of these things interferes with wearing the clothes, but I will feel better when they're done.
I want to start working with silk and I have quite a collection gathered. I still have no idea, however, about what patterns to use. Mostly I will have to make muslins I presume to get everything in order before starting on a silk version. The April Burda WOF has some possibilities. The Stitchers Guild has a silk thread on the go, as well as a Chanel-type jacket thread. Both interesting possibilities, though I don't think I would have occasion to wear the jacket.
Meanwhile, I think I will work toward some SWAP complimentary pieces until I get a new color scheme worked out. I have lots of fabric purchased for SWAP that was not included for various reasons, but which will go with some of the SWAP pieces nicely.
- Red Wool Crepe (2m)
- Olive Stretch Corduroy (2+m)
- Olive Faux Suede (1.5m or maybe less)
- Green/Ivory cotton far out print (2m or so)
- Ivory bamboo knit (3m)
- Gold dupioni with bees on it (1.5m)
- Green dupioni (2m)
- Sage green polyester (1.5m) junky stuff from Walmart, probably won't use it.
- Taupe stretch corduroy matching SWAP pants (1m or so)
- AND I really need a nice pair of black pants in a summer weight - no fabric on hand for that.
Just before our weekend road trip I fixed the cuffs on the red shirt, and partially cut out green stretch corduroy pants using April 07 BWOF #120. I compared the pattern with the one I used for my taupe pants, and they were close enough to be twins. These are billed as "narrow" but in fact they are about half an inch wider in the leg than the ones already made. I wanted a new pattern to avoid the V-shaped yoke in the back that unnecessarily emphasizes my butt. Hopefully later today, I'll get to work on those pants.
I learned that stretch cord can be marked with a tracing wheel and no paper. The marks don't stay on forever, but its better than getting all that chalk all over the place.
I also learned that rubbing alcohol will remove interfacing glue from my iron. I fully 'fused' a piece of interfacing wrong way up. There are other products mentioned on the forum in response to my question posed there.
On our trip to Nova Scotia we found an off-the-beaten-track sheep farm with delicious yarns, and a few other interesting items, like hand-made wooden knitting needles. I'm not a knitter, but I bought some roving and felting needles to experiment with on the ivory fleece jacket. Another new thing to try.
It's April 26-27: Green stretch cords underway

I've been working exclusively on the green cords (except for buying 6 Simplicity patterns on sale -- not sure how they will work as they will all need a bust and back length adjustment. These are to help me work away my stash of silks and knits)
The pants are going well, but this pattern is weird, weird, weird. The front of the pants from fly to pocket is higher than the rest of the pant pieces, (ie no waistband in that part). The waistband is fitted into the remaining front and continues around to center back, then a facing is sewed to the top of the whole thing and turned under.
Sounds simple except that the waistband is attached where the pocket opening starts, which means there are already several layers (pocket facing, pocket yoke) to contend with, and now the waistband, and at the top, the facing. This is stretch corduroy and the thickness is quite unmanageable, especially considering this is supposed to be topstitched close to the top edge. I also think the seam joining the front to the waistband should be turned onto the waistband, and not onto the front as suggested in the pattern directions. This would add 2 more layers in that lump that has to be folded over when the facing is turned back. But that's not the biggest challenge. Burda directions for installing a fly are impossible to understand -- not the first time I fell back on an easy, fly attachment with no underflap. Also, the directions for applying the facing at the fly area are initially incomprehensible, so I spent a long time muttering and mumbling to myself about how to get the top edge looking good.
The zipper does not go to the top. It stops at a mysterious "mark" 1.25" from the top edge and there is supposed to be a button-hole at the top. Interesting concept, but there seems to be nothing to attach the button to. Possibly, if I had installed the fly underflap, it would extend under the fly in such a way as to accomodate a button, but it would also have added another bunch of bulk right at the center front.
I finally figured out how to do the facing/fly attachment, which was quite logical after all, and it looks pretty good. Great on the front, ok on the inside.

I decided to just let the zipper come up to within a quarter inch of the top and put a hook there,maybe sewing on a button for show. Still, the zipper just "stops" with nothing to cover the top edge of it. I must have missed something there.I think this would be the case regardless of how I finished to facing or the underflap.
I've enjoyed the challenge of figuring this out (or rather, not figuring it out). I knew these pants would fit, and the pocket installation is flatter and simpler than in my SWAP stretch pants, whose pockets never did lie flat -- my fault most likely.
I think these pants would have been very difficult if alterations were required. The design of the top does not lend easily to basting and re-fitting. The curved partial waistband, and curved fitted facing do not have a side seam, and thus would not be happy getting their sizes changed, and matched again to each other.
There is supposed to be topstitching at the top of the waistband, through the facing. I topstitched first then turned the facing under. No way it would look good sunk through all those layers, especially in corduroy, which probably should not have been topstitched in the first place. The bottom of the band is also topstitched, and this I did through the facing to hold it down. Because of the design, there are no lumps to stitch through there.
Next round
- I would draft a waistband for the entire top of the pants, possibly giving it side seams to allow for adjustments later, or elastic in the back if they stretch out.
- The fly and zipper would be traditionally installed, with a button at the top. I need to study up on how the top fasteners work on pants. You would think a person who has worn pants for almost 60 years would know that, wouldn't you.
- I would make the pocket facings and the waistband facing from a stretch poplin or other lighter material, especially if using corduroy or similar weight fashion fabric
Wednesday, April 25, 2007
SWAP Voting: Having Your Say
It's time to vote for your favorite SWAP! To vote, join Artisan's Square here. To see the 31 SWAPs go here. Vote for your top 3, in order, 1st, 2nd, 3rd and email your vote to Julie. You'll find the email address on the home page for Timmel Fabrics. You have until April 28 to cast your ballot.
THE VOTING DILEMMA: Everyone has created a wardrobe appropriate to their skills and clothing needs. It seems intrusive to make a judgement in the light of all that hard work. The hard part for me has been to find a way to decide upon my 'favorite.' I came up with some criteria, and tried to put point values on various aspects such as color coordination..construction difficulty, fit, variety of styles and ultimate 'looks'. First place was easy, but second and third were tough. It was especially hard to decide the dress SWAPs, as I rarely wear dresses and really can't relate.
Philosophical questions arose: Is a 99% fantastic SWAP which includes a purchased item better than a 95% fantastic SWAP with all items sewn by the SWAPper; is a technically magnificent SWAP, with garments I don't really like, better than a SWAP I love which is made up of simpler garments? Eventually, I found my judgements were based upon the technical complexity of each wardrobe, as well as the variety of "looks" each wardrobe afforded the wearer.
I think it boils down to the fact that "there are no right answers." It's interesting that there are no voting criteria that I am aware of, so the diversity of our group will be seen in the outcome of the voting.
Tuesday, April 10, 2007
The Whole Shebang!!
Finished. Done.
All that remains are the last 2 pictures, and the list of pattern numbers. Wow, what a feeling. Like childbirth, the pain is all but forgotten.
Here's the whole shebang.

All that remains are the last 2 pictures, and the list of pattern numbers. Wow, what a feeling. Like childbirth, the pain is all but forgotten.
Here's the whole shebang.

Sunday, April 8, 2007
Making pictures
 I've taken a lot of pictures during this SWAP. Not many of them have been terrific ones, and I suppose it doesn't really matter. For the past few days I have been thinking of which pictures to take for Julie's site, and how to present my wardrobe. I've been hoping for some warm weather to take advantage of the natural light, but that is not to be according to the forecast.
To entertain myself, and re-visit some rusty skills, I created a collage of some of the details in my collection. Hopefully I'll get it done tomorrow, and SWAP will be behind me.
On to the next challenges.
Friday, April 6, 2007
Dissecting Frogs
 (edited April 7)
It's been an interesting day. I decided to put frogs on my stippled jacket, but locally there were only 3 useable frogs in the entire city. (I'll admit to being a little fussy.)
Good Friday being a day for meditative pursuits, I chose the quiet and refreshing activity of inventing how to make frogs. I had a magazine article, and a couple of online links, but I could not find the frogs I wanted.
Below you will see the penultimate steps to Creating the "button" side of the frogs. Above, I have shown a more civilized presentation of the loop end. With luck, more details will follow if Photoshop agrees to cooperate.
 Here's what I did, briefly. You will need to determine the measurements based upon your application.
1. Make 2 side-by side coils.
Light cording, ironed flat, and melted with a candle at both ends to seal, (6.5" long after sealing. Mark with a long pin in the middle and tightly coil one end to the pin. Stick the pin horizontally through all the layers of cording, and coil the other end in the opposite direction- like a sideways S. When it meets the first coil, take out the pin and put it through the whole shebang.)
2. Steam-a-Seam the back to hold everything in place. This is not absolutely necessary, but helps with the first few until you get the feel of how everything goes together. A whole lot of pins will accomplish the same thing.
3. Make the 3rd coil and the knot. One side of the frog gets a knot, the other gets a loop. For my application, the distance from the edge of the frog to end end of the knot is 5/8". It is necessary to check these measurements against the garment to be sure things end up where you want them.
Use a piece of cording about 13" long. Tie a bulky knot a couple of inches from the end. Measure 5/8" from the knot on the long end and mark with a pin. Measure 3.25" from the pin, cut and seal the end. Coil from the end to the pin. Insert the pin through all the layers of cording.
4. Make the 3rd coil and the loop.
Use a 7" piece of cord. Seal one end and measure 3.25" and place a pin. Coil the sealed end to the pin, and place the pin through the coil as previously. Fold the remaining end into a loop of the required length, ending where the pin is inserted. Carefully remove the pin, and replace it to include the outer side of the loop.
5.Sew the 2 parts together - Ball Side.
Using matching thread, sew randomly through the double coil to secure it, especially at the center where the 2 coils join. Similarly secure the single coil, then center the single coil beside the other two, with the ball string sandwiched between. Stitch the 3 coils together. Fold the loose end of the ball string to the back and stitch the two strands together so they lie flat. Fasten the string at the back near the middle of the top coil. Use a bit of Fray-Check if you think it's necessary.
Loop Side - see picture at the top.
Proceed as above. Pin the loop coil to the other coils and secure the tail end at the back of the frog, ending in the middle of the upper coil as above. Be sure to test the loop length before making the whole set of frogs.
Please note: In the illustration Step 4 is confusing. After replacing the pin, so the end pierces the outside strand of the loop, I turned the frog over so I could attach it on the right side of the 2-coil piece. If you apply it to the left of the 2-coil piece, you don't have to turn it over in step 4. We learn with experience.
That's all folks. Back now to finish those frogs.
Thursday, April 5, 2007
The End is in Sight
 Wow. The only thing left is to hem the last skirt! And of course, to take some good pictures.
I finally found and installed the snaps in my jean jacket. I got the red shirt finished, washed and pressed, and decided to put frogs on my reversible jacket, though it will be fine with no fasteners if they don't get done.
I've posted pictures along the right margins, of all but the last red shirt, the black skirt and the stippled jacket. Those pictures will be there shortly. Also, some of the pattern numbers have to be filled in.
It feels good to have got this far with the whole project, and of course, it feels good to be wearing some clothes that go well together. I think I like the jean jacket the best, and the bermberg lining makes it feel really luxurious. My next favorite would be the stretch cords. I will definitely work with this fabric again as I love the feel of the completed garment.
Even after looking at it for 4 months, and making 2 garments, I still like the red flower print. There is more in my stash for inspiration on another day, or perhaps for another person.
I just bought a new Husqvarna Sapphire!! It's only job on this SWAP will be a double needle hem, but I am sure it will see good use taking my SWAP learning onward to new garments. The same day I bought my machine, the new BWOF arrived with loads of summer possibilities. Good grief!! and I said I was going to take a sewing hiatus after SWAP concluded.
It's time to think of a brief write-up for Julie's SWAP page to summarize the frustration and fascination of this experience.
Sunday, April 1, 2007
The Red Shirt
 1. Burda Zip Front Shirt #8360
Down to the wire, and the final garment is almost finished! I thought I would add a picture, even though there are threads everywhere, wrinkles and still a few pins.
The red cotton shirt which so lovingly entered this life, has decided to be yet another difficult child, with much ripping out, and unsatisfactory behavior.
The fabric is a heavy quilting cotton, in a fabulous blue-red. I bought it near the beginning of the SWAP and never looked at again until last week. It has a slight overall print on the right side and I discovered that it is clear red on the wrong side -- what opportunities I missed for a reversible garment I will never know.
I promised myself I would be totally careful, not work when tired, and not whine and complain in my blog about the problems with this garment. BUT>>>>>>>
It seems I still have a lot to learn, even when being careful. I guess I should be glad I didn't choose silk or polyester for my final garment.
I have a new theory on sewing. If it works the first time, count your blessings. If it doesn't, you'll have to do it at least three more times.
- The cutting worked out splendidly.
- So did the marking, I even marked any curvy seam lines. Cotton is so great, takes markings, and in this case, no worry about anything showing through.
- The first interfacing (a light woven fusible) didn't stick, and the fabric bubbled even though the interfacing had been pre-shrunk. It pulled off easily, though.
- The second interfacing, a soft woven fusible whose name I forget, went on nicely, but seemed to have a lot of depth, soft but thick. I should not have interfaced both collar pieces, it is too fat.
- I had to move a bust dart, which should have been corrected on my pattern.
- The collar went together well.
- It only had to be sewn on twice.
- It was very difficult to fit the facings to the neck edge, especially around the shoulder seam. I always have a problem with this type of facing and hereby make a vow to never use them again. (This collar has no stand so it is sandwiched between the garment and the facings).
- I forgot to make the back neck facing deeper, so it fails to lie perfectly flat and looks pathetically home-made.
- The zipper proved almost as difficult as it did in slippery polyester in a previous incarnation. It is sandwiched between the facing and the front edges, and for some reason it is difficult to get everything to line up so the edges dont overlap or spread apart when the zipper is closed. You can't fit the zipper in place when the seam is basted together, so there is a lot of opportunity for the edges to slip out of place on top or underneath -- If I ever make this again, I will re-think totally how to do this. At least now I know that the zipper teeth have to exactly match the edge of the seam line.
- My machine is acting up, and refused to allow me to stitcheven one straight line of topstitching without a break, to stop and start again.
- The fabric is a heavy quilting cotton, in a fabulous blue-red, but it is actually too heavy for a shirt of this style. I bought it near the beginning of the SWAP and never looked at again until last week. It has a slight overall print on the right side and I discovered it is clear red on the wrong side --- what opportunities I missed for a reversible garment I will never know.
- I decided to create a pattern for a cuff on the sleeve, in a style I had never done before. On a scale of 1 - 10 the cuff comes off at about a 6.5. I will probably make a post-SWAP adjustment and just put a topstitched facing at the bottom of the sleeve.
- The sleeve caps did not cooperate, and had to be pinned a dozen times before fitting correctly -- even then, not the world's greatest job. Usually I don't have much problem with sleeves. Perhaps the stiffness of the fabric was involved. Maybe I just should have left it for a day or two.
- I followed someone's advice from an online hint, and sewed the sleeves before the side seams, approximately to the notches. This allows the sleeve to be "inset" at the bottom edge where it joins the side seam, which in my view, makes for a better fit and feel. Also, it's easier to finish the side seams this way.
- During pattern fitting, and in my previous shirt, the shoulder seams were ok. In this one, the right shoulder should have had a forward-shoulder adjustment. It's quite noticeable, but because I did not have the side seams sewed up, I missed it when working early in the construction. Too late to change it as the seams are finished and there's not enough fabric to make the move.
- The little vents at the bottom of the side seams, and the hem edges below the zipper worked out splendidly and neatly.
- I love this fabric color with my skin, but it will be warm for a long-sleeved shirt....most likely I will wear it unzipped with a light T or tank underneath.
2. JEAN JACKET
For what seems like months, I have been trying to purchase snaps for my jacket along with a tool to put them on. All in vain. I have several kinds of snaps, and several tools bought and borrowed, but no combination that works effectively.
Finally in desperation, I bought one of those little silver things you pound the snaps on with, and snaps whose design is fine on top, but the unsnapped surfaces look clunky - picture later. I practiced. I found one of my tools would punch great holes. I measured several times. I put the snaps into the cuffs first....All went well.
Ready for the main row of front snaps, starting at the bottom. #1 snap went in well, right up to the point where I hammered my thumb holding onto that stupied silver bit of metal. Split the thumb and the nail, so spent the next 20 minutes with an ice cube.
Thankfully DH came to my rescue and pounded in the next 7 snaps, fashioning a holding device with a pair of pliers. With 3 more to go, the little plastic thingy that you pound into split into a dozen pieces.....so off I go again for yet another tool. It's spring!! I want to wear that jacket!!!
Subscribe to:
Posts (Atom)