Friday, April 27, 2007

Post-SWAP: Where Do We Go From Here?

Post SWAP update: April 18, 23, 26, 27.

[For the SWAP click here]


It's April 18. What's been happening since SWAP?

It's been a while since I posted. I have done a little sewing, but mostly I've been doing some planning for the next phase.

I have ruined one attempted top of ivory panne velour. It turned out too small. Not enough stretch for the pattern. No great loss.

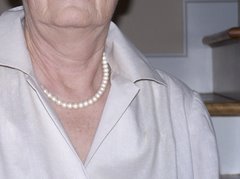
I have completed the unfinished muslin jacket of ivory Malden Mills fleece. It still needs pockets, or some sort of embellishment, but it is wearable. I used bathing suit lining for the binding, but I didn't do a great job of it. It's cuddly stuff -- the fleece, not the binding -- and feels good on these cold damp April days we're having here. Good enough for around the house, or walking in the evenings. I made it to have something visible for walking at night.

I also started some of the touch-ups required on my SWAP garments:
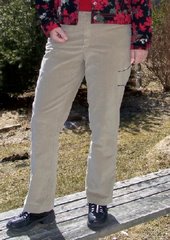
  • The One-Seams got taken in, and I did that yesterday. They were too low in the crotch, and the legs too full. The fabric is quite heavy. I took in about an inch all the way up the leg seam on both sides.
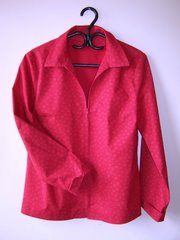
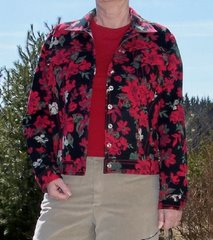
  • The red shirt cuffs do not feel right, so I'm taking them off and putting a facing on the outside of the sleeve bottom instead, and
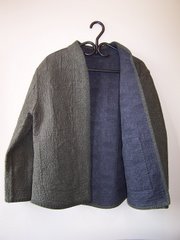
  • the pockets of my reversible jacket really should be removed, and get binding all around instead of having the bottom edge turned under. An oversight at the time while rushing. None of these things interferes with wearing the clothes, but I will feel better when they're done.

I want to start working with silk and I have quite a collection gathered. I still have no idea, however, about what patterns to use. Mostly I will have to make muslins I presume to get everything in order before starting on a silk version. The April Burda WOF has some possibilities. The Stitchers Guild has a silk thread on the go, as well as a Chanel-type jacket thread. Both interesting possibilities, though I don't think I would have occasion to wear the jacket.

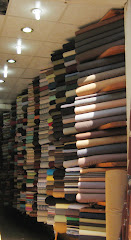
Meanwhile, I think I will work toward some SWAP complimentary pieces until I get a new color scheme worked out. I have lots of fabric purchased for SWAP that was not included for various reasons, but which will go with some of the SWAP pieces nicely.
  1. Red Wool Crepe (2m)
  2. Olive Stretch Corduroy (2+m)
  3. Olive Faux Suede (1.5m or maybe less)
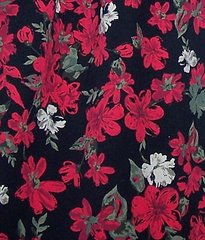
  4. Green/Ivory cotton far out print (2m or so)
  5. Ivory bamboo knit (3m)
  6. Gold dupioni with bees on it (1.5m)
  7. Green dupioni (2m)
  8. Sage green polyester (1.5m) junky stuff from Walmart, probably won't use it.
  9. Taupe stretch corduroy matching SWAP pants (1m or so)
  10. AND I really need a nice pair of black pants in a summer weight - no fabric on hand for that.
It's April 23: fixes and new stuff

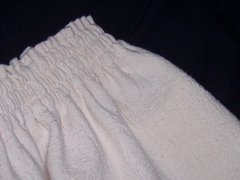
Just before our weekend road trip I fixed the cuffs on the red shirt, and partially cut out green stretch corduroy pants using April 07 BWOF #120. I compared the pattern with the one I used for my taupe pants, and they were close enough to be twins. These are billed as "narrow" but in fact they are about half an inch wider in the leg than the ones already made. I wanted a new pattern to avoid the V-shaped yoke in the back that unnecessarily emphasizes my butt. Hopefully later today, I'll get to work on those pants.

I learned that stretch cord can be marked with a tracing wheel and no paper. The marks don't stay on forever, but its better than getting all that chalk all over the place.

I also learned that rubbing alcohol will remove interfacing glue from my iron. I fully 'fused' a piece of interfacing wrong way up. There are other products mentioned on the forum in response to my question posed there.

On our trip to Nova Scotia we found an off-the-beaten-track sheep farm with delicious yarns, and a few other interesting items, like hand-made wooden knitting needles. I'm not a knitter, but I bought some roving and felting needles to experiment with on the ivory fleece jacket. Another new thing to try.


It's April 26-27: Green stretch cords underway

I've been working exclusively on the green cords (except for buying 6 Simplicity patterns on sale -- not sure how they will work as they will all need a bust and back length adjustment. These are to help me work away my stash of silks and knits)

The pants are going well, but this pattern is weird, weird, weird.
The front of the pants from fly to pocket is higher than the rest of the pant pieces, (ie no waistband in that part). The waistband is fitted into the remaining front and continues around to center back, then a facing is sewed to the top of the whole thing and turned under.

Sounds simple except that the waistband is attached where the pocket opening starts, which means there are already several layers (pocket facing, pocket yoke) to contend with, and now the waistband, and at the top, the facing. This is stretch corduroy and the thickness is quite unmanageable, especially considering this is supposed to be topstitched close to the top edge. I also think the seam joining the front to the waistband should be turned onto the waistband, and not onto the front as suggested in the pattern directions. This would add 2 more layers in that lump that has to be folded over when the facing is turned back.


But that's not the biggest challenge. Burda directions for installing a fly are impossible to understand -- not the first time I fell back on an easy, fly attachment with no underflap. Also, the directions for applying the facing at the fly area are initially incomprehensible, so I spent a long time muttering and mumbling to myself about how to get the top edge looking good.

The zipper does not go to the top. It stops at a mysterious "mark" 1.25" from the top edge and there is supposed to be a button-hole at the top. Interesting concept, but there seems to be nothing to attach the button to. Possibly, if I had installed the fly underflap, it would extend under the fly in such a way as to accomodate a button, but it would also have added another bunch of bulk right at the center front.

I finally figured out how to do the facing/fly attachment, which was quite logical after all, and it looks pretty good. Great on the front, ok on the inside.

I decided to just let the zipper come up to within a quarter inch of the top and put a hook there,maybe sewing on a button for show. Still, the zipper just "stops" with nothing to cover the top edge of it. I must have missed something there.I think this would be the case regardless of how I finished to facing or the underflap.

I've enjoyed the challenge of figuring this out (or rather, not figuring it out).
I knew these pants would fit, and the pocket installation is flatter and simpler than in my SWAP stretch pants, whose pockets never did lie flat -- my fault most likely.

I think these pants would have been very difficult if alterations were required. The design of the top does not lend easily to basting and re-fitting. The curved partial waistband, and curved fitted facing do not have a side seam, and thus would not be happy getting their sizes changed, and matched again to each other.

There is supposed to be topstitching at the top of the waistband, through the facing. I topstitched first then turned the facing under. No way it would look good sunk through all those layers, especially in corduroy, which probably should not have been topstitched in the first place. The bottom of the band is also topstitched, and this I did through the facing to hold it down. Because of the design, there are no lumps to stitch through there.


Next round

  • I would draft a waistband for the entire top of the pants, possibly giving it side seams to allow for adjustments later, or elastic in the back if they stretch out.
  • The fly and zipper would be traditionally installed, with a button at the top. I need to study up on how the top fasteners work on pants. You would think a person who has worn pants for almost 60 years would know that, wouldn't you.
  • I would make the pocket facings and the waistband facing from a stretch poplin or other lighter material, especially if using corduroy or similar weight fashion fabric

Wednesday, April 25, 2007

SWAP Voting: Having Your Say

It's time to vote for your favorite SWAP! To vote, join Artisan's Square here. To see the 31 SWAPs go here. Vote for your top 3, in order, 1st, 2nd, 3rd and email your vote to Julie. You'll find the email address on the home page for Timmel Fabrics. You have until April 28 to cast your ballot.

THE VOTING DILEMMA: Everyone has created a wardrobe appropriate to their skills and clothing needs. It seems intrusive to make a judgement in the light of all that hard work. The hard part for me has been to find a way to decide upon my 'favorite.' I came up with some criteria, and tried to put point values on various aspects such as color coordination..construction difficulty, fit, variety of styles and ultimate 'looks'. First place was easy, but second and third were tough. It was especially hard to decide the dress SWAPs, as I rarely wear dresses and really can't relate.

Philosophical questions arose: Is a 99% fantastic SWAP which includes a purchased item better than a 95% fantastic SWAP with all items sewn by the SWAPper; is a technically magnificent SWAP, with garments I don't really like, better than a SWAP I love which is made up of simpler garments? Eventually, I found my judgements were based upon the technical complexity of each wardrobe, as well as the variety of "looks" each wardrobe afforded the wearer.


I think it boils down to the fact that "there are no right answers." It's interesting that there are no voting criteria that I am aware of, so the diversity of our group will be seen in the outcome of the voting.


Tuesday, April 10, 2007

The Whole Shebang!!

Finished. Done.
All that remains are the last 2 pictures, and the list of pattern numbers. Wow, what a feeling. Like childbirth, the pain is all but forgotten.

Here's the whole shebang.

Sunday, April 8, 2007

Making pictures

I've taken a lot of pictures during this SWAP. Not many of them have been terrific ones, and I suppose it doesn't really matter. For the past few days I have been thinking of which pictures to take for Julie's site, and how to present my wardrobe. I've been hoping for some warm weather to take advantage of the natural light, but that is not to be according to the forecast.

To entertain myself, and re-visit some rusty skills, I created a collage of some of the details in my collection. Hopefully I'll get it done tomorrow, and SWAP will be behind me.

On to the next challenges.

Friday, April 6, 2007

Dissecting Frogs

(edited April 7)

It's been an interesting day. I decided to put frogs on my stippled jacket, but locally there were only 3 useable frogs in the entire city. (I'll admit to being a little fussy.)

Good Friday being a day for meditative pursuits, I chose the quiet and refreshing activity of inventing how to make frogs. I had a magazine article, and a couple of online links, but I could not find the frogs I wanted.

Below you will see the penultimate steps to Creating the "button" side of the frogs. Above, I have shown a more civilized presentation of the loop end. With luck, more details will follow if Photoshop agrees to cooperate.

Here's what I did, briefly. You will need to determine the measurements based upon your application.

1. Make 2 side-by side coils.
Light cording, ironed flat, and melted with a candle at both ends to seal, (6.5" long after sealing. Mark with a long pin in the middle and tightly coil one end to the pin. Stick the pin horizontally through all the layers of cording, and coil the other end in the opposite direction- like a sideways S. When it meets the first coil, take out the pin and put it through the whole shebang.)

2. Steam-a-Seam the back to hold everything in place. This is not absolutely necessary, but helps with the first few until you get the feel of how everything goes together. A whole lot of pins will accomplish the same thing.

3. Make the 3rd coil and the knot. One side of the frog gets a knot, the other gets a loop. For my application, the distance from the edge of the frog to end end of the knot is 5/8". It is necessary to check these measurements against the garment to be sure things end up where you want them.

Use a piece of cording about 13" long. Tie a bulky knot a couple of inches from the end. Measure 5/8" from the knot on the long end and mark with a pin. Measure 3.25" from the pin, cut and seal the end. Coil from the end to the pin. Insert the pin through all the layers of cording.

4. Make the 3rd coil and the loop.
Use a 7" piece of cord. Seal one end and measure 3.25" and place a pin. Coil the sealed end to the pin, and place the pin through the coil as previously. Fold the remaining end into a loop of the required length, ending where the pin is inserted. Carefully remove the pin, and replace it to include the outer side of the loop.

5.Sew the 2 parts together - Ball Side.
Using matching thread, sew randomly through the double coil to secure it, especially at the center where the 2 coils join. Similarly secure the single coil, then center the single coil beside the other two, with the ball string sandwiched between. Stitch the 3 coils together. Fold the loose end of the ball string to the back and stitch the two strands together so they lie flat. Fasten the string at the back near the middle of the top coil. Use a bit of Fray-Check if you think it's necessary.

Loop Side - see picture at the top.
Proceed as above. Pin the loop coil to the other coils and secure the tail end at the back of the frog, ending in the middle of the upper coil as above. Be sure to test the loop length before making the whole set of frogs.
Please note: In the illustration Step 4 is confusing. After replacing the pin, so the end pierces the outside strand of the loop, I turned the frog over so I could attach it on the right side of the 2-coil piece. If you apply it to the left of the 2-coil piece, you don't have to turn it over in step 4. We learn with experience.

That's all folks. Back now to finish those frogs.


Thursday, April 5, 2007

The End is in Sight

Wow. The only thing left is to hem the last skirt! And of course, to take some good pictures.

I finally found and installed the snaps in my jean jacket. I got the red shirt finished, washed and pressed, and decided to put frogs on my reversible jacket, though it will be fine with no fasteners if they don't get done.

I've posted pictures along the right margins, of all but the last red shirt, the black skirt and the stippled jacket. Those pictures will be there shortly. Also, some of the pattern numbers have to be filled in.

It feels good to have got this far with the whole project, and of course, it feels good to be wearing some clothes that go well together. I think I like the jean jacket the best, and the bermberg lining makes it feel really luxurious. My next favorite would be the stretch cords. I will definitely work with this fabric again as I love the feel of the completed garment.

Even after looking at it for 4 months, and making 2 garments, I still like the red flower print. There is more in my stash for inspiration on another day, or perhaps for another person.

I just bought a new Husqvarna Sapphire!! It's only job on this SWAP will be a double needle hem, but I am sure it will see good use taking my SWAP learning onward to new garments. The same day I bought my machine, the new BWOF arrived with loads of summer possibilities. Good grief!! and I said I was going to take a sewing hiatus after SWAP concluded.

It's time to think of a brief write-up for Julie's SWAP page to summarize the frustration and fascination of this experience.

Sunday, April 1, 2007

The Red Shirt

1. Burda Zip Front Shirt #8360

Down to the wire, and the final garment is almost finished! I thought I would add a picture, even though there are threads everywhere, wrinkles and still a few pins.

The red cotton shirt which so lovingly entered this life, has decided to be yet another difficult child, with much ripping out, and unsatisfactory behavior.

The fabric is a heavy quilting cotton, in a fabulous blue-red. I bought it near the beginning of the SWAP and never looked at again until last week. It has a slight overall print on the right side and I discovered that it is clear red on the wrong side -- what opportunities I missed for a reversible garment I will never know.

I promised myself I would be totally careful, not work when tired, and not whine and complain in my blog about the problems with this garment. BUT>>>>>>>

It seems I still have a lot to learn, even when being careful. I guess I should be glad I didn't choose silk or polyester for my final garment.

I have a new theory on sewing. If it works the first time, count your blessings. If it doesn't, you'll have to do it at least three more times.
  • The cutting worked out splendidly.
  • So did the marking, I even marked any curvy seam lines. Cotton is so great, takes markings, and in this case, no worry about anything showing through.
  • The first interfacing (a light woven fusible) didn't stick, and the fabric bubbled even though the interfacing had been pre-shrunk. It pulled off easily, though.
  • The second interfacing, a soft woven fusible whose name I forget, went on nicely, but seemed to have a lot of depth, soft but thick. I should not have interfaced both collar pieces, it is too fat.
  • I had to move a bust dart, which should have been corrected on my pattern.
  • The collar went together well.
  • It only had to be sewn on twice.
  • It was very difficult to fit the facings to the neck edge, especially around the shoulder seam. I always have a problem with this type of facing and hereby make a vow to never use them again. (This collar has no stand so it is sandwiched between the garment and the facings).
  • I forgot to make the back neck facing deeper, so it fails to lie perfectly flat and looks pathetically home-made.
  • The zipper proved almost as difficult as it did in slippery polyester in a previous incarnation. It is sandwiched between the facing and the front edges, and for some reason it is difficult to get everything to line up so the edges dont overlap or spread apart when the zipper is closed. You can't fit the zipper in place when the seam is basted together, so there is a lot of opportunity for the edges to slip out of place on top or underneath -- If I ever make this again, I will re-think totally how to do this. At least now I know that the zipper teeth have to exactly match the edge of the seam line.
  • My machine is acting up, and refused to allow me to stitcheven one straight line of topstitching without a break, to stop and start again.
  • The fabric is a heavy quilting cotton, in a fabulous blue-red, but it is actually too heavy for a shirt of this style. I bought it near the beginning of the SWAP and never looked at again until last week. It has a slight overall print on the right side and I discovered it is clear red on the wrong side --- what opportunities I missed for a reversible garment I will never know.
  • I decided to create a pattern for a cuff on the sleeve, in a style I had never done before. On a scale of 1 - 10 the cuff comes off at about a 6.5. I will probably make a post-SWAP adjustment and just put a topstitched facing at the bottom of the sleeve.
  • The sleeve caps did not cooperate, and had to be pinned a dozen times before fitting correctly -- even then, not the world's greatest job. Usually I don't have much problem with sleeves. Perhaps the stiffness of the fabric was involved. Maybe I just should have left it for a day or two.
  • I followed someone's advice from an online hint, and sewed the sleeves before the side seams, approximately to the notches. This allows the sleeve to be "inset" at the bottom edge where it joins the side seam, which in my view, makes for a better fit and feel. Also, it's easier to finish the side seams this way.
  • During pattern fitting, and in my previous shirt, the shoulder seams were ok. In this one, the right shoulder should have had a forward-shoulder adjustment. It's quite noticeable, but because I did not have the side seams sewed up, I missed it when working early in the construction. Too late to change it as the seams are finished and there's not enough fabric to make the move.
  • The little vents at the bottom of the side seams, and the hem edges below the zipper worked out splendidly and neatly.
  • I love this fabric color with my skin, but it will be warm for a long-sleeved shirt....most likely I will wear it unzipped with a light T or tank underneath.
All that remains is the hem, and binding on one sleeve seam. Then it's into the wash with some fabric softener to see if it will feel a little lighter.

2. JEAN JACKET

For what seems like months, I have been trying to purchase snaps for my jacket along with a tool to put them on. All in vain. I have several kinds of snaps, and several tools bought and borrowed, but no combination that works effectively.

Finally in desperation, I bought one of those little silver things you pound the snaps on with, and snaps whose design is fine on top, but the unsnapped surfaces look clunky - picture later. I practiced. I found one of my tools would punch great holes. I measured several times. I put the snaps into the cuffs first....All went well.

Ready for the main row of front snaps, starting at the bottom. #1 snap went in well, right up to the point where I hammered my thumb holding onto that stupied silver bit of metal. Split the thumb and the nail, so spent the next 20 minutes with an ice cube.

Thankfully DH came to my rescue and pounded in the next 7 snaps, fashioning a holding device with a pair of pliers. With 3 more to go, the little plastic thingy that you pound into split into a dozen pieces.....so off I go again for yet another tool. It's spring!! I want to wear that jacket!!!