Stippled Jacket - written last Friday, Feb 23
On Sunday I learned that Class #2 for the stippled jacket was to be this Friday (ie. today). I had been mulling over some stippling designs in my head, procrastinating the actual start of the project. I got together with my friend Lynn, who is also making a jacket, and we 505'd our sandwiches together in her garage. She's done this sort of thing before. I have not.
With Lynn pushing me I decided to get started on the stippling and stop thinking about it. I drew a pattern of parallel channel stitching along the curved bottom of the jacket, and the bottom of the sleeves, and parallel lines up the center front (where I hope to put a zipper, not being overly fond of those froggy type closures).
The sleeves were just 2" columns of stippling , separated by 1/2" empty columns. I started with the sleeves, and they looked great, so I took at the front pieces. I had a notion to create some flowers somewhere in the business, so I stitched vertical rows of 2" wide stippled panels, separated by 1/2" wide unstippled strips. In the middle of each side, I left the two center panels unstippled, where I created a design of roses and leaves, that looked quite lovely on paper. Quite stunning actually. I developed a pattern from a clipart image, and traced it onto 'heat-away' stabilizer. This was my only mistake in this otherwise nicely percolating project.
There always has to be one idiot move. I never used this sew and burn stuff before, and did not take the trouble to test it first. It was not a lovely experience. It did not sew nicely, it did not burn off nicely, it stinks and is very dusty. Brushing off with a toothbrush works fairly well, but bits of the stuff stuck between some of the close-together stitches. There is no way I can explain (other than working in a rush instead of in my own good time) why I did not use a water-soluble stablizer for this....the whole damn thing has to be washed to shrink it anyway. (This is why I have used the word "idiot").
I stippled amongst my flowers on the first side, then decided it would look better unstippled, leaving the flowers alone in the wide panel on each front. Unstippling is a nice thing to do while watching TV.
My sewing machine decided to have a few grumpy moments during the process, and will likely need a trip to the doctor soon. There is a noise I do not like, and it fetches up every once in awhile and kicks out the bobbin case. I think I forgot to speak nicely to it, and to the fabric each time I sat down.
The good news, though, is that I have dragged out my mother's sewing machine table, and DH put a solid bottom in the 'hole' of it so I now have a level surface to work from. This is great except when I have to lower or raise the feed dogs. Then the whole machine has to be lifted to reach the thingy at the back. It's a very bad design for anyone who changes the dogs frequently. Huskystar C10, new last May. Works well most of the time, but has a couple of chronic hiccups.
Finally, Friday morning around 11am I was done with the sewing, thread snipping, and trimming away of visible flannelette (to prevent fuzzies in the wash). Into the wash the whole thing goes. Out it comes later, looking shrunken as expected, pretty good as far as the effect of the stippled lines on back and sleeve, and so-so on the front. The flowers are not as effective as I had hoped, but alas, one major problem: There is a little hole in the middle of one section of flower, worn totally through by a combination of too much brushing to get rid of the stabilizer, and the subsequent effect of washing. I really think there must be something caustic in that stabilizer because it seemed to act almost like bleach on the fabric surface. Some of the stitching in that area is also pulled out, so I am CRUSHED, that I have managed to ruin this expensive fabric, not to mention all the work.
This makes it slightly less annoying that the course leader called to change the date to next week! Meanwhile, I discovered that I forgot to do the collar, so that is yet to be sandwiched and stippled, and now, rather than purchase yet more fabric and do another front, I think I will make a repair using a pocket. It will have to be sewn on my hand, but that is ok. I guess its good I have another week, more really, because I will be away next week anyway, and won't make the lesson.
It's all repairable, but I cannot hide my disappointment. Also makes it difficult to 'get back on the horse' with enthusiasm, especially after the weekend's disasters with the stretchy pants. I think I need to make a very simple top to regain my confidence.
Friday, February 23, 2007
Sunday, February 18, 2007
Perfect Light, Imperfect Sewing

This was not a perfect sewing weekend, though it started out to be. In spite of all you might read here, it's still fun (and educational) or I wouldn't be doing it. Sewing reduces stress. Blogging reduces the stress of sewing. What does one do when the blog won't work?
Earlier I had cut out a Burda WOF 02/07 #120 trousers for stretch fabric. I had nice taupe corduroy, a perfect match to the taupe in my print skirt and jacket. I love stretch cords, so I had high hopes for this stuff.
I never sewed stretch cord before. I didn't think this was particularly heavy material when I bought it , but soon discovered it to be extremely bulky to work with...something like cardboard in a funny way....maybe its just that the color reminds me of "shirt" cardboard that my mother used to save, and that we used as kids for various projects -- before the days of cheap paper -- (my Grandfather used to save the cardboard that separated the shredded wheat in the box -- before the days of plastic individual wrappings. A thrifty lot we were.
But I digress. These pants have a front yoke/pocket arrangement similar to one I had sewn early in my re-entry into stitchery. A oiece of cake one would think.
Annoying time-waster #1: POCKET-YOKE INCOMPATIBILITY: In stretch fabric, the pockets seemed to acquire a mind of their own, and one in particular developed a little wrinkle/twist, that would not go away no matter how many times I ripped out seams and re-laid things together. This is not a pattern problem, but may be a directions problem. I would have to think about when to sew the seams that hold the pocket to the yoke (so your kleenex doesn't fall throuth). Maybe not until everything else is done.
Annoying time-waster #2: TOPSTITCHING WRONG WAY UP: These pants have a back yoke kind of like you see in jeans. Topstitched, like the front pocket edges. I had a tiny bit of exactly matching thread, so I topstitched the yoke (accidentally forgetting to take the stitch length off basting -- oh well, nice long topstitches don't look that bad, I guess) with the good thread, then used up the rest as I went along. I tried on the pants at some point and noticed that this yoke seam makes a delightful wide curved line across the largest part of my butt -- not one bit attractive. Fortunately, my butt is not as big as it used to be, so I guess I'll just have to live with this....I still like stretch corduroy.
In the morning, I tried the pants on again, and lo and behold, the topstitching is done upside down. I turned the seam down instead of up. My DH, observing my enhanced butt said, "water wont run off that seam." Leave it to a man. Fortunately I had already noticed, and had come downstairs, seam-ripper in hand --- but now out of good thread.
I hate it when people say "Everything happens for a reason." I don't believe that for a minute, however, I have to say I was glad I had used bastings to topstitch, because I would still be there trying to get small stitches out from among the serging of the seam edge.
Annoying time-waster #3: Fitting without knowing how : A trip to the store for thread and I'm back checking the fit again. In spite of measurements matching well, I still had to take in the side seams, and there's still that baggy bit in the back where I likely have to take up the back inseam...then there's the very low level of the back waist seam which is chronic with pants. Is it length or something to do with the crotch design? With every change results in another wrinkle. Are the wrinkles real, or just because I have an inch and a half of bunched up fabric and pins in the crotch seam? ...I really need a crash course in pants design for this. I fiddle and farted around with the fitting on and off through the day, until time for my sister to come for supper. I am beginning to not be so in love with stretch corduroy, even though it's been washed twice, it still feels stiff and unfriendly. BUT... my sister just came back from India, and brought me some heavenly silks. Something for after SWAP.
Annoying time-waster #4: FLIPPING OVER THE FLY: Any pants I made before in my limited experience get the fly over with before sewing the legs seams. And, though I never had much problem with any fly I have done (all 4 of them) the Burda fly directions were impossible to fathom, and of course, I was anxious to see if these pants were going to be a good fit, so I did the inseams first and basted the side seams. I found Burda's detailed fly directions in one of their sewing lessons in the January 07 issue, a happy coincidence resulting from drinking too much coffee after supper, and not being able to sleep. In the stupor of night, I really did not know if I could follow them or not, but decided I might try in the morning. In the light of day, I decided to go with Sandra Betzina's fly which I had used before.
Long story short. Twice I have had SB's fly turn out on the wrong side. The first time I thought it was supposed to be that way, and thought nothing of it. This time , I know my fly is different from the one in the book, and I think I have made some fundamental left/right error that I will surely fix before the next time. The fly is ok even though it's backwards and has too much space between the fold at Center Front and the attachment of the zipper. Also, the extension of the front yoke is supposed to interact in some way with the fly, where everything comes together and gets joined up. One side of the extension has to be cut off at center front to accomodate the fly design. Guess which side I cut off! Of course, the wrong one, because now my fly is on the wrong side. No, I'm not taking it out -- the stitches will show in the corduroy, even if I wanted to put myself to the grief of a re-run. I am beginning to not care if I have these pants.
Time-wasting annoyance #5: FORGETTING TO PRESS: Now things just start adding up. I forgot to press the inseam seam before sewing the outside seam. I could not serge the inseam until I had the fit right at the crotch, which I could not do until I had basted and re-basted the crotch seam, which I could not do until I had fit the side seams around the hips. So, given this vicious circle, I am now having to do both the pressing and the serging on the long legs instead of at least having one of those tasks on a flat surface. This is nothing I suppose compared to some of the other fiddle and fuss.
Upcoming time-wasting annoyance #6: WAISTBAND: The fit around the waistband has me worried, as the back is too low, and risks plumbers butt when seated -- which is why I am still in the adjustment phase from up there in #3. Perhaps all will go well, maybe even a tad of elastic will solve everything. Should a stretch corduroy waistband have interfacing -- is that an oxymoron?
Hey!! It's all still fun, right?
Wednesday, February 14, 2007
SWAP #5: Beige Blouse -Finished
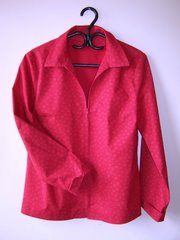
I mentioned this a couple of days ago. The Burda WOF 10/06 #106, but these are my first pictures.
I wore it today for the first time. That shirt gave me a lot of grief, mostly self-induced, but it sure looks great, and garners compliments galore.


Changes I made:
No gathered sleeves. Next time I would make the sleeve narrower at the bottom and face for a turned-up cuff. The gathers might look ok in another fabric, but not this almost sheer Swiss dot, a kind of cross between beige and ivory.
Less fullness in sleeve cap: I had to adjust the sleeves because of a post-cutting fit problem, hence much of the design fullness was lost. I don't like too-full sleeves so it did not matter. Might make a difference in another fabric, or for another sense of fashion.

I would like to try this in a very drapy rayon fabric, something not not sheer at all. I think it is designed for a polyester print, but I try, on principle, not to wear polyester -- at least not smooth, slippery, incredibly hot versions of it.
Other progress:
- Taupe Cords: I cut the stretch corduroy after a lot of measuring and tracing the Burda WOF 02/07 #120. The measurements are almost exactly those of a favorite pair if stretch cords I have now, so here's keeping the fingers crossed for the fit.
- Bamboo Skirt: Yesterday I decided on the hem length for the bamboo skirt, and have it pinned. Waiting for DH to check the pinning before stitching it in.
- Reversible Jacket:
 I practiced my stippling on a test 'sandwich' . I like my sunflower idea with varieties of stippling moving away from it. - but as I pass by my sandwich sitting on the ironing board, I can't help but wonder if maybe more than one flower, randomly thrown into a chaotic blend of stippling might just work.
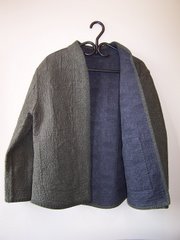
On the black side, the stippling shows well, on the green print side, I have not found a color that really pops, so I think a green much like the print will be best for a rather subdued presentation. This picture does not do justice to the colors.
 - Black Cami: I tried to sew some lace to the top of the black sparkly cami, but the neckline tipped outward in the middle, as often happens with necklines that I fold under. This time I sewed the lace to the front right side and turned the seam to the back, topstitching on the right side through the seam. Looks good, but for the sagging forward in the middle. This little item will likely be a scrapper -- not a SWAP thing anyway.


- Bamboo Cowl Neck shirt: I opened up the rest of the bamboo, and found I had enough for the cowl neck shirt I was thinking of, but I couldnt' get into the mood to work with the bamboo. Very soft and stretchy, this pattern is cut in one layer, the whole front and whole back, all on the bias. You can see why I need to be in the mood. Corduroy is so much easier by comparison.
- Fleece Jacket: I bought 2 zippers, neither of which is right, but in this town you can't usually get what you want. I also fiddled with some lining fabric to put inside the bottom of the front pieces for hidden pockets, and to stiffen up the jacket a bit. Undecided about the outcome; maybe I should just put pockets on the outside. I'm also undecided about whether to try to stiffen up the bottom of the back a bit. The fleece is quite lightweight, and I think I should have interlined the whole thing. I own a Woolrich Fleece jacket which has the inside pocket bit, but only the binding gives some body to the bottom edge in the back. These kinds of things I set aside for a day or a week, and when I go back to them, the answer seems to be there.
Tuesday, February 13, 2007
SWAP #5 - Black Jalie Crossover
My SWAP numbers are all changed since re-evaluating.
This is the day of our Chinese New Year potluck supper. In between simmering some ribs and procrastinating housecleaning, I decided to try and finish up a few things before tackling the joys of stippling.


The black crossover top was first on the list. This is a poly knit, lovely to handle, and probably the easiest knit I have worked with so far (or maybe I'm just getting more confident.) My other crossover was made with a fabric containing lycra, and fits very snugly, so this time I added about 3/4" to the side seams tapering to nothing from the waist to the armhole. The shirt fits loosely. Even considering the added width, the fit is totally different from (different than? I never got that right) my other shirt. It is very comfortable, but not body-hugging like some knits. I probably could have forgotten the extra width and still had a nice fit.

The pictures seem to emphazise some wrinkles ("drape" I would say to make me feel purposeful about it), but this does not seem obvious when the shirt is being worn. Cameras never lie I suppose, but neither does a flash do justice to anything. (Most especially it does not do justice when it glares off ample boobs in a knit shirt.)
This fabric sewed up nicely on the serger and on the regular machine. I used a twin needle for the first time ever to do the neck, sleeve hems and bottom. No problems at all, no stretching. Good luck or good management, I'm not sure. I think it was luck.
Sunday, February 11, 2007
SWAP Status
Today I realized what a grand journey this SWAP adventure is. I'm still feeling a bit overwhelmed, though I am sure I will finish unless something really unexpected comes along.
Because I have no TNT's, I've had to do a few muslins along the way, and I've made a few garments for my original SWAP which somehow no longer fit very well. So now I need to regroup and decide where to go now. I'm counting almost-done things as done here, because none of them have more than a half-hour of work to complete, and besides, it feels better than way.
JACKET(S)
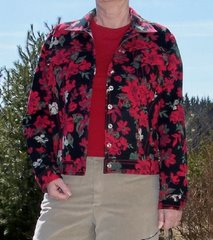
PRINT JEAN JACKET - counts as Top #6
Done. (except for snaps which seem unavailable around here)
REVERSIBLE STIPPLED JACKET
Barely started. Pieces are cut and 'sandwiches' ready. Still need to practice the stippling and finalize the stitching design. There is another class in two weeks, at which time we are supposed to have the stippling done.
BOTTOMS
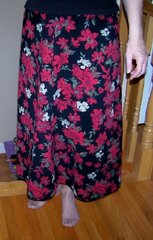
PRINT SKIRT
Done!
IVORY ONE-SEAM PANTS
Done!
BLACK BAMBOO GATHERED SKIRT
Almost Done. (except for hem, which needs measuring, decision re length and stitching) This skirt may even need a tie belt of some sort.
TAUPE STRETCH CORD PANTS
Not even started. I want to try the latest Burda WOF pant for stretch fabrics, so I will need to trace and check the sizing carefully.
TOPS
RED JALIE CROSSOVER TOP - LS
Done!
BLACK JALIE CROSSOVER TOP - SS
Done. (except for hemming which will take a little care because its a soft knit)
EDIT: FEB 13 - Finished!
BEIGE LS BLOUSE - BURDA WOF
Done!
BLACK or IVORY BAMBOO COWL NECK TOP
Not started. Not even cut, but I used the pattern successfully before. The black bamboo is on hand, the ivory is ordered.
SHIRT #5 - UNDECIDED
Originally this was to have been a red cotton zip front shirt with a collar. I could also do the same shirt from stretch corduroy to match the taupe pants below. I've made this pattern before and have the fit down quite well. I really need to look at the overall collection of garments, and make the decision about this shirt using all the other pieces. There are several tops in my original plan that I have not used. I think I need an ivory top, perhaps more than a red one.
EXTRA PIECES
In the process of doing muslins, and of changing my mind I have completed or partially completed several other pieces that may or may not belong in the SWAP in preference to some of those listed above. One of these days I will need a fashion consultation with some friends.
RED VELOUR SKIRT - Done around Christmas. Seems too dressy for the rest of the SWAP
BLACK VELOUR TANK TOP - Done as SWAP #1 but also quite dressy. More importantly, the fit is not quite right. I think I need a tank top as part of this SWAP, though. I have some ivory velour, maybe I could experiment with that.
IVORY FLEECE JACKET - Well underway. This is the unreversible muslin for my Saf-T-Pockets reversible jacket. It still needs a zipper, and the collar finished up, as well as binding and maybe pockets. It is lovely and goes well with the whole SWAP. It would be sad to leave my jean jacket our of the SWAP though, but perhaps that is what will happen. Certainly the print jean jacket and the print skirt are a bit of overkill when worn together. Also, 3 jackets in the SWAP would also be overkill, since it's really tops that I need much more than jackets.
PLUM PANTS - Done. These were an afterthought at the time, and I felt they would go fine with the tops I was planning, but they definitely do not go with the print jean jacket which was another afterthought. They're getting a lot of wear though.
BLACK KNIT CAMI - Partially done. This morning's adventure, in between cutting kiddie clothes and making my fabric 'sandwiches.' I made the pattern from an existing garment to use up the remnants from the black crossover top, a black sparkly knit from Julie which I love.
End of SWAP reflections for today.
Because I have no TNT's, I've had to do a few muslins along the way, and I've made a few garments for my original SWAP which somehow no longer fit very well. So now I need to regroup and decide where to go now. I'm counting almost-done things as done here, because none of them have more than a half-hour of work to complete, and besides, it feels better than way.
JACKET(S)
PRINT JEAN JACKET - counts as Top #6
Done. (except for snaps which seem unavailable around here)
REVERSIBLE STIPPLED JACKET
Barely started. Pieces are cut and 'sandwiches' ready. Still need to practice the stippling and finalize the stitching design. There is another class in two weeks, at which time we are supposed to have the stippling done.
BOTTOMS
PRINT SKIRT
Done!
IVORY ONE-SEAM PANTS
Done!
BLACK BAMBOO GATHERED SKIRT
Almost Done. (except for hem, which needs measuring, decision re length and stitching) This skirt may even need a tie belt of some sort.
TAUPE STRETCH CORD PANTS
Not even started. I want to try the latest Burda WOF pant for stretch fabrics, so I will need to trace and check the sizing carefully.
TOPS
RED JALIE CROSSOVER TOP - LS
Done!
BLACK JALIE CROSSOVER TOP - SS
Done. (except for hemming which will take a little care because its a soft knit)
EDIT: FEB 13 - Finished!
BEIGE LS BLOUSE - BURDA WOF
Done!
BLACK or IVORY BAMBOO COWL NECK TOP
Not started. Not even cut, but I used the pattern successfully before. The black bamboo is on hand, the ivory is ordered.
SHIRT #5 - UNDECIDED
Originally this was to have been a red cotton zip front shirt with a collar. I could also do the same shirt from stretch corduroy to match the taupe pants below. I've made this pattern before and have the fit down quite well. I really need to look at the overall collection of garments, and make the decision about this shirt using all the other pieces. There are several tops in my original plan that I have not used. I think I need an ivory top, perhaps more than a red one.
EXTRA PIECES
In the process of doing muslins, and of changing my mind I have completed or partially completed several other pieces that may or may not belong in the SWAP in preference to some of those listed above. One of these days I will need a fashion consultation with some friends.
RED VELOUR SKIRT - Done around Christmas. Seems too dressy for the rest of the SWAP
BLACK VELOUR TANK TOP - Done as SWAP #1 but also quite dressy. More importantly, the fit is not quite right. I think I need a tank top as part of this SWAP, though. I have some ivory velour, maybe I could experiment with that.
IVORY FLEECE JACKET - Well underway. This is the unreversible muslin for my Saf-T-Pockets reversible jacket. It still needs a zipper, and the collar finished up, as well as binding and maybe pockets. It is lovely and goes well with the whole SWAP. It would be sad to leave my jean jacket our of the SWAP though, but perhaps that is what will happen. Certainly the print jean jacket and the print skirt are a bit of overkill when worn together. Also, 3 jackets in the SWAP would also be overkill, since it's really tops that I need much more than jackets.
PLUM PANTS - Done. These were an afterthought at the time, and I felt they would go fine with the tops I was planning, but they definitely do not go with the print jean jacket which was another afterthought. They're getting a lot of wear though.
BLACK KNIT CAMI - Partially done. This morning's adventure, in between cutting kiddie clothes and making my fabric 'sandwiches.' I made the pattern from an existing garment to use up the remnants from the black crossover top, a black sparkly knit from Julie which I love.
End of SWAP reflections for today.
Saturday, February 10, 2007
Bits and Snippets
Another weekend, although retirement does kind of make weekends irrelevant. I've been doing a lotof sewing lately, so maybe I'll just take some time off for a bit, trace a Burda WOF or something.
PROGRESS:
Yesterday my 8-year-old grandson and I finished his flannel shirt. He's "student of the week" next week (whatever that means) and he is going to show off his handiwork. He chose the fabric, and chose and traced the pattern, stitched most of the straight seams, topstitched the pocket on, and sewed on the buttons. He even supervised the buttonholes - which mostly involved keeping his foot on the 'gas' until the machine finished its job. His next project: "comfy pants" which are just elastic topped pyjama pant kind of things. I think he should be able to pretty much do the whole thing himself.
Yesterday I also made a wearable muslin of a Saf-T-Pockets reversible jacket. It's not finished yet, but I needed to check the pattern for size before a class last night. We are making stippled reversible jackets. My muslin is a lovely garment (so far anyway). I used a piece of Malden Mills 100 ivory fleece from Wazoodle. I first sized for a Medium, sewed it half together and found it way too big. Then I notice that the finished measurements are on the pattern envelope....if only I had looked first. I had to take the whole thing apart of re-cut for a Small, which fits my definitely not-small body perfectly.
The Reversible Quilted Jacket class was a fun event, and we got our fabric pieces cut and did a little practice stippling. I have not done this before, and I am sure there are way too many options for me to make a decision about what sort of pattern to use. I still need to buy my flannel for the inside layer, and will do a few practice runs before moving into my very expensive cotton. The jacket will coordinate with my SWAP, as does my ivory muslin. Wow, a surfeit of stuff is piling up.
This morning I finally sewed the buttons on the beige Burda WOF blouse, making a completion of SWAP #8 if you don't count the items that will be changed for something else.
Next on the agenda is to finish the black crossover top, so I can change my serger thread to finish the ivory jacket seams. After that, hem the bamboo skirt. My sewing mentor did not think it wise to try to do a decorative stitch all the way around the light-weight knit, so I will machine stitch a 1" hem, or possibly do a cover stitch (another new experience) on her serger next week.
Saturday, February 3, 2007
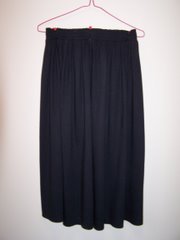
SWAP #7: Black Bamboo Skirt
Recently I bought some 60" tubular black bamboo jersey from Wazoodle, just to find out what it was like. It's a very soft lightweight, quite stretchy fabric, that feels wonderful. A friend suggested a softly gathered skirt, with an elastic waistband.
Since I had just finished my OneSeam Pants, I decided to use the principles of the waistband there, to apply to my skirt. However, in the interests of keeping the waistband as un-bulky as possible, I decided to make it separate, and just long enough to fit over my hips.
The whole thing went together quite simply, considering I had no pattern, and really little idea how full the skirt should be. I don't generally like gathers at the waist, but this is so soft, I figured it would be ok. I decided to use the full 60" width, thus avoiding side seams.
There was only one major hassle, from which I easily recovered. I am sure there is a better way, but I'm happy with the result.
How'd I do that?:
If anyone has a way to do this better, I'm happy to hear it. I think with this fabric, it would have been fine to proceed totally as for the OneSeam Pants, as there is not a lot of bulk, however, some fabrics would be better with a less bulky waistband, and this is what I decided to experiment with.
Since I had just finished my OneSeam Pants, I decided to use the principles of the waistband there, to apply to my skirt. However, in the interests of keeping the waistband as un-bulky as possible, I decided to make it separate, and just long enough to fit over my hips.
The whole thing went together quite simply, considering I had no pattern, and really little idea how full the skirt should be. I don't generally like gathers at the waist, but this is so soft, I figured it would be ok. I decided to use the full 60" width, thus avoiding side seams.
There was only one major hassle, from which I easily recovered. I am sure there is a better way, but I'm happy with the result.
How'd I do that?:
- Cut the band 4" wide and just long enough to slide over the hips when stretched
- Measure 1.25 inch sports elastic to be snug at the waist, about 5-6" shorter than the waist measurement
- Seam the short edges of the band, leaving an opening for the elastic.
- Fold the band in half and serge the long edges of the band together
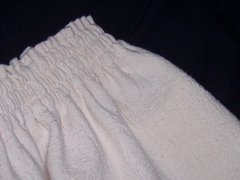
- Topstitch at the fold, one presser foot width - be sure you have enough band remaining to hold the elastic.
- Quarter the band and mark with pins, then divide each quarter in half, and each of these halves in half again. You will have 16 sections of band about 2.5 inches wide, depending on the original band length.
- Decide on the length of the skirt and cut off the appropriate piece of fabric. Leave a generous hem. [I'm not done hemming yet, so this idea may change once I see the effect of a wide hem, but my instinct says that the lightweight jersey will need some body in the hem to keep it from rolling, and to make it drape well.]
- Quarter the top of the skirt, then divide into 16ths as for the band. You can eyeball the divisions once you get the eighths marked, as there will be more gathering once the elastic is installed.
- Match the pins, and fold the extra fabric into a box pleat in the middle of each section of the band. [I am sure it would be simpler to run a gathering thread around the top of the skirt, and pull it in to fit, much as you would do to set in a sleeve, but the pleats were my experiment of the day.]
- Once all the pleats are pinned in place, BASTE, remove the pins and serge the band onto the skirt top with a 4-stitch overlock, keeping the folds in the skirt perpendicular to the line of stitching.
- Feed the elastic into the band. Try on the skirt, and shorten the elastic if necessary.
- Butt the ends of the elastic with zig-sag stitches onto a light piece of fabric (per Louise Cutting's directions, which works beautifully)
- Close the opening with slipstitches.
- Evenly spread the gathers around the band, and put pins vertically at each quarter.
- Topstitch 3 rows approx 1/4 inch apart through the elastic, keeping it stretched smooth by pulling in front and behind as you stitch (also per Louise Cutting).
- This is where I ran into a bit of a problem: There was a bit of space, rather uneven ugly space between the bottom row of topstitching, and the actual serged seam holding the bottom of the skirt to the band. This was the result of having seamed the waistband to the skirt. This did not pass muster at all.
- My solution was to fold back the band, and re-stitch the skirt and band together inside the serged seam, along the bottom topstitching line. I stretched each quarter of the band flat, and sewed with the band on top follow the top-stitching. This strengthened the waist seam, and made all the lumpy unevenness disappear.
- A nice fit at the waist, comfortable, soft and light for travelling.
If anyone has a way to do this better, I'm happy to hear it. I think with this fabric, it would have been fine to proceed totally as for the OneSeam Pants, as there is not a lot of bulk, however, some fabrics would be better with a less bulky waistband, and this is what I decided to experiment with.
Thursday, February 1, 2007
SWAP #6 - OneSeam Pants -- Fait Accompli!!
 Everything that could have gone wrong did...but the OneSeams are done, and they look terrific!
I decided to make these pants because they seem to be one of the online community's favorite wardrobe items. Knowing they were elastic waist, and quite roomy, I figured I could use them for tai chi pants, but honestly did not think they would suit me as a true 'wardrobe' item.
Things that went wrong #1: Cut the wrong size: My friend and I cut our patterns together, and helped with our alterations and size choices. After cutting, I lost a bit of weight, and did a bit more careful measuring and decided I should have cut a smaller size. My friend meanwhile, came to the same conclusion, fortunately BEFORE she had done the cutting. She finished her pants, I tried them on, and re-cut my pieces. It was trickier than I expected to get the smaller size to fit completely within the medium pieces without changing the grain line. Also, I had to re-measure for the length and crotch adjustments.
Things that went wrong #2: Used lining for the pocket:
 I decided to use the elephant ear pockets as my fashion fabric was quite heavy, and I did not want 2 more layers of it in the front of the pants. I used a piece of lining fabric, a bit lighter in color than the pants. It did not occur to me until the pockets were sewn in that I should have faced an inch or so on the bottom pocket piece with the same fabric as the pants. The difference in the fabric is obvious if the pocket opening is pulled in the least way. I adjusted the bar tack at the bottom and moved it further up, and stitched down form the waist a bit to make the pocket opening smaller, and hold the front ovelap in place. All's well that ends well.
Things that went wrong #3: Sewed the pocket onto the wrong side: This happened AFTER I got the directions clarified by Louise Cutting herself. Feeling especially gratified and confident, I proceeded to put in the second pocket up to the point where the first one had stymied me. My plan was to follow Louise's new directions on both pockets at once. Fine idea, until I came to the part where it says "turn pocket to the wrong side" whereupon I discovered it was already on the wrong side. These pockets have a long slit into the side of the pants, the seam is sewed with tiny stitches tapering to nothing at the bottom. These I had to remove, re-sew, re-serge the edges and finally get the pocket done right. This is when I decided never to do elephant ear pockets again. I would rather get used to stuffing a kleenex in my sock.
Things that went wrong #4: Made the elastic too long: I have difficulty knowing exactly where my waist is, but I measured the elastic snugly, and 6.5 inches shorter than the top of the pants, per the pattern recommendations. It went in nicely, but when I tried it on, it was not snug enough. I cut about an inch and a half off.....and let go of the ends!! It took me 2 TV shows and a phone call to fish out the ends with a pin, bit by bit, at the end of which time my daughter said "Why didn't you use the kitchen tongs?" I pinned both ends back a couple of inches and tried the pants on. The fit was good, so I decided to cut the 4" off.
Things that went wrong #5: The elastic would not stretch enough: Early this morning, thinking I would be able to finishe the pants in time for tai chi class at 10:00 am, I sewed the elastic ends together and proceeded to make the first topstitching line. Delightfully even, nicely matching thread, machine purring and happy.....until I got to about 10" from the starting point and had a pile of gathers accumulating and no way for the elastic to stretch through them. All this before breakfast yet! Now I know why Louise has an instruction about making a tuck in the waistband if the elastic will not stretch as long as the top of the pants. This must be done at the start, however, not after cutting another 5.5 inches off the recommended length. I figured I would just cut off the whole band and sew on another one, but when I returned to the task I found that if I removed half of the topstitching row and paid more attention to the stretching I could get it to work, just barely, but it did work.
Things that went wrong #6: Hems don't match: Happy to be almost done, I serged the leg bottoms, turned them up on the hemline and tried them on. One leg is quite a bit shorter than the other. How can this be when both pieces were cut together? The mystery remains, and will forever. I got someone to pin the hems, cut and re-serged one leg, and stitched them up.
ALL IN ALL, the pants would have gone quite quickly but for
 correcting all these misadventures, and best of all, the final product looks quite sharp, and is incredibly comfortable. I would like to try the pattern again, just to get some value out of all these problems. I am going to try the tapered leg version, as the straight leg ones are quite large in the legs. I am wondering what they would be like made from a light knit -- perhaps I would have to downsize once more to allow for the stretch - research required.
Subscribe to:
Posts (Atom)