
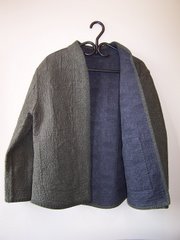
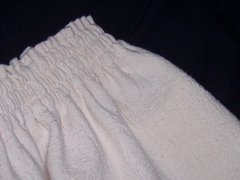
Pictures here - more to come. This picture shows the shoulder seam. To the right is the collar, edges unfinished.
I found a dearth of Stippled Jacket instructions on the web, so I wrote my own. If you want to go directly to the instructions, such as they are, please scroll down.
Stippled Jacket: How'd I do that?? (edited March 13 re binding instructions; edited March 15 re bindings; Edited March 25 to tidy things up)
These instructions were written as I worked my way through a 3-class course on making a quilted reversible jacket. I did not have written instructions until the 3rd class, and did not find any online. Thus I have written what is here to be helpful but NOT AUTHORITATIVE. Remember, it is based on my vast experience of my ONE and only jacket:
- Pick a pattern that is easy. Make sure it fits. My pattern was Rochelle's Reversible, by Saf-T-Pockets. (This pattern is available from Timmel's )
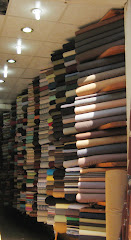
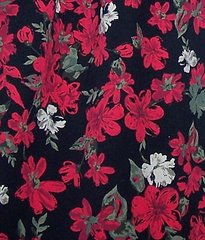
- Choose colors for back, front, collar or other decorative accents, and binding of jacket edges. You need enough fabric for both sides. Good fabric makes this a very expensive jacket.
- Calculate enough fabric for each side of the jacket to cut all pattern pieces (no facings required) with 2" of empty space all around. You will need the same amount (as one jacket side) of plain ordinary flannellette (or other batting of your choice).
- Add enough extra fashion fabric for bindings. You need to bind all seams on ONE side of the jacket. (Decide which side will have 'normal' looking seams, and which side will have the seams covered with a 1/2" of self-fabric.) I am sorry I don't have much feel for how much binding you get from any amount of fabric. You will need bias for the armscye for sure, and whatever other seams have any shape to them.
- Note the width of the seam allowances on your jacket pattern. If you have 5/8" seam allowances, you will need binding that is 2.25" wide for the seams that cover the raw edges (#5). If your seam allowances are 1/4" your binding will be 1.5" wide. (In our group, the rest of the people are quilters, who are used to 1/4" seams. I left mine at 5/8 and cut them down after the fact.) Save all this info for later.
- Also note, that you also need bias binding for all around the edges of the jacket which may match or coordinate with your other colors. I was advised that 1/2 meter would give me enough bias for this, and it turned out that I had plenty leftover. The width of that binding depends on whether you want it single thickness or folded.
Experiment until you find the width you want before cutting your strips. My binding is 2.75". I am using a folded binding, which I am stitching a bit over 3/8" from the edge, using my presser foot as a stitching guide. The edges of my binding are set back 1/4" from the garment edges. This reduces the bulk in the binding, and allows sufficient fabric to fold over the edge and have approx. 1/2" on the other side. The binding which you turn to the other side must be wide enough to cover the stitching line. I am hemming it down by hand. Important edit March 15: In hindsight, I would not try to stitch the binding offset from the jacket edge. I would make my binding 1/4 - 1/2" wider, stitch it aligned to the edge, and trim after the fact if I thought there was too much bulk. It was altogether too difficult to keep the edges the correct distance, and to be sure that the underside of the binding was caught in the stitching line. As previously suggested: Experiment. - Wash the flannelette. Iron the fashion fabric. DO NOT WASH the fashion fabric. Flannelette shrinks a lot, so it's best (so I'm told) to wash it once first. The fashion fabric (usually cotton of some sort) will shrink a bit and cause the jacket to become puffy after stippling.
- Make a fabric sandwich of the 2 sides (right sides facing out) with flannelette between. You can cut each piece separately, and make the sandwich later, or you can stack the 3 pieces and cut all together.
- Cut each pattern piece so there is at least 2" of space all around. Watch grain lines as you would laying out any pattern. Mark the grain lines and other significant info on the piece of fabric, remembering that you will be recutting after stippling and washing the pieces. Its helpful to know at that point where the grain line is, and the center of the sleeve, center front etc.
- Stabilize the sandwich so it won't move as you stipple. I sprayed very lightly with 505 between the flannel and the fashion fabrics, but pins will work. Don't worry about small wrinkles.
- Practice your pattern. Using sandwiched scraps, practice stippling in any design, or combined with channel stitching. In my reading, it is recommended to stipple a bit on a scrap each time you go back to your jacket work, just to get into the 'flow' of it. Suit yourself.
- Stipple all your pattern pieces, extending into the 2" of extra fabric. (Note: my stippling pattern involved alternating 1/2" wide and 2" wide vertical channels, with free-motion stippling in the 2"wide sections. In retrospect, I would make the narrow channels about 1/8" wider so they would be a little more emphasized after shrinking.)
- Throw everything into the washer and dryer, including any SCRAPS which will be used for BINDING, or fabric specifically purchased for binding. Your jacket pieces will be lovely when they come out of the dryer.
- Lay out your pattern pieces on the stippled work, and cut. Pay attention to previous markings and grain lines.
- Cut seam bindings (2.25 or 1.5" -- see #4) sufficient for side, sleeve, armscye, collar and shoulder seams for one side of the jacket. Bias is preferable but not always necessary.
- Cut bias bindings 3.00" - 3.25" (for approx 1/2" binding from folded bias) sufficient for the front edges, bottom edge and collar edges from your chosen fabric. (Note: I am no binding expert...consult with a quilter to get the bindings right.)
- Fold the bindings in half lengthwise, right sides facing out and press.
INSTRUCTIONS FOR ALL SEAMS: HOW TO BIND THE SEAMS: The seam bindings are stitched when the seam is sewn, with the raw edges lined up with the edges of the seam. The seam allowance is then graded and bulk reduced. The seam is pressed to one side, and the binding laid over the raw edges and hemmed or topstitched down.
DETAILS: - Determine which side to put the binding on when sewing the seam. )Think about how the binding will face when folded over the raw edges):
- Shoulders, side seams and sleeves --binding on the front, press seam to back
- Armscye, binding on the body, press seam to sleeve. (Edited note: My jacket has slightly dropped sleeves. Turning the binding toward the sleeve, though it makes it easier to deal with the fullness of the sleeve, tends to make the sleeve look more dropped than it should. If I were to make this jacket again, I would sew the binding onto the sleeve edge and turn it toward the jacket side. -- just a personal observation, and perhaps not at all helpful)
- Collar - binding on the body, press seam toward collar - not sure about this, as I did my collar differently.
- Reduce the bulkiness of the seam by trimming the seam allowance to 1/4", then further trimming one of the allowances on an angle to grade. (On the armscye, be sure the sleeve allowance is the one you grade, as it is bulkier than the armhole edge.)
- Press the seam to one side using a damp cloth. Press hard on both sides of the jacket. I pressed both before and after trimming away the bulk.
- Pull the binding over the raw edges, press and baste into place. The binding should be about 1/2" wide. If you are going to topstitch, baste I closer to the seam than where you will be stitching so that your basting does not get caught up in the topstitching. It's easy to baste right at the ironing board while the seam is damp and warm, then everything stays put while you try on. I found pinning in this thickness of fabric to be less than joyful -- also occasionally painful.
YOU'LL USE THESE DIRECTIONS AS YOU PROCEED WITH SEWING YOUR JACKET BELOW - FINALLY YOU CAN START SEWING YOUR JACKET!! Pick a side to be the "right" side. The other side will have the seams showing, which will be bound as above. Use a stitch length of 3 or 3.5. At each step, bind as above.
- Stitch SHOULDER seams, right sides together, with the BINDING on the FRONT.
- Fit the SLEEVE and sew with the BINDING on the BODY before stitching up the side seams. Finish as above noting removal of bulk on the sleeve side.
- My sleeve was set in and slightly dropped. In this bulky fabric I am not thrilled with it. Next time I would either go with a raglan type sleeve, or I would have a sleeve that rested on the shoulder as in a suit jacket -- this would mean fighting with ease in the sleeve cap, but I think it would look better than the dropped shoulder in the bulky fabric.
- Sew on the COLLAR with the BINDING on the BODY.
- I made my collar (a stand-up one) in two pieces, and sewed it on conventionally so the neck edge seam was not bound. The instructor thought it might be bulkier than using the binding method above. But it worked well for me with careful trimming. It probably depends on the pattern. If I were to do this again with this pattern I probably would not use any flannel in the collar pieces.
- Sew the SIDE and SLEEVE seams. The bulk at the underarm will be problematic. It takes a lot of trimming and pressing to make it work. Use bias if you can to bind the seam. If not, be sure there is a little extra working length in the binding at the underarm to help it go on easily.
- Technically, I think the binding on the back of armscye seam should stop 1/8" before the side seam. Thus it would NOT be sewn into the side seam when it is stitched. The side seam's binding would then cover the raw edge, substantially reducing the bulk at this spot. Insight too late, but maybe next time.
- Decide what you are doing about CLOSURES before finishing the front edge bindings below. You may have to stitch something into the same seam as the binding.
- Sew the EDGE BINDINGS around the edges of the jacket, sleeves and collar, lining up the folded edges of the binding with the edge of the jacket. Press and fold over to the other side. Stitch in the ditch or hand stitch in place.
ENJOY YOUR NEW JACKET!!


2 comments:
Hey, maybe you can help me! I'm making a jacket and it says self fabric seam binding, im confused as to what that means - is that when you take another strip fold it over the front and back of the raw edge an sew it all down with the end folded under? when i say end folded under the side that is on the front of the jacket that will show - im so confused!!
It means you make seam binding with the same fabric as the jacket, and bind the edges according to the pattern directions.
Post a Comment