
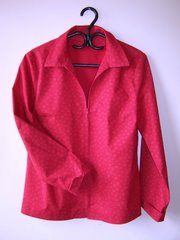
Finally another item completed -- and not one of the 3 previously being worked upon!
I was anxious to try my hand an another knit after getting some advice from the Stitchers group. My Jalie pattern had arrived from Julie, and with it some cotton-lycra jersey that was begging to be made into something. Unlike the Jalie T-shirt pattern, this one has a wide band sewn on the crossed edges. Since my binding attempts have been disastrous, I thought this might be a bit easier.
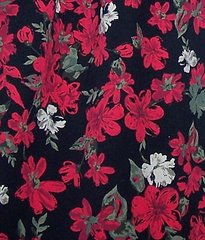
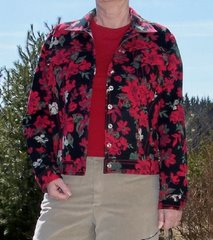
Combining advice and previous experience I decided to make Julie's recommended pattern, the Crossover, from the red jersey. To me, it seemed there was barely enough stretch to match the pattern recommendation, however, I decided to proceed anyway.
Jalie CrossOver - a piece of cake: I traced the pattern according to my measurements - or to be specific, my pre-Christmas measurements. I was surprised to find that it fits perfectly through the shoulders and sleeves. It is only at the waist, and through the lower back that the sizing seems a bit off. It turns out I was off by an inch in my waist measurement. Also, there are some rolls in the area of the waist that do not take kindly to snugness. On the other hand, there is enough fabric in the cut of the garment (and the extra 1.5 inches that I added for my long waist) to make crosswise wrinkles which hide some of the underlying imperfection. In retrospect I should have used a larger size for the side seams. This would mean the upper part of the sleeve would also be wider to accomodate, but that would work out all right I think.
The tracing and cutting took a couple of hours, and the sewing of this garment did not take much longer than that, though I did it in several sittings. Much of the time was spent experimenting on scraps to get settings correct on the serger, and on holding my breath hoping everything was going ok.
There were no difficulties to speak of. I used a 4-thread overlock for sewing on the band, my sewing machine for the shoulders seams because of the way the back neck is finished, and the serger for the other seams. Sometime I basted first. I hemmed the bottom as stated below on my sewing maching. Only a couple of tiny bits had to be picked out and I ended up a very happy camper -- sitting snugly by the fire.
I am pleased with this shirt in spite of its tight fit. It is comfortable, and will probably stretch a little over time. Also, I hope to shrink a little over time.
This is the first garment I made with my serger. It is also the first T-shirt type garment that actually turned out well. I think I've learned enough to handle more knits.
Some of my discoveries:
- each knit is entirely different from its siblings, and needs a lot of experimental stitching of remnants to get the machine and the serger geared up to work with the fabric.
- the pattern size can probably be adjusted to accomodate knits without the right amount of stretch....this I will work on as time goes by

- for this pattern, quartering the band left one of the quarters with too much fullness. This shows on the left front. I should have followed my instinct and adjusted it before serging the band on. I can't quite figure why the other side did not seem to have the same problem. Perhaps a subtlety of how the ends of the band meet at the side seams or something.
- I learned how to follow the ribs with a steel ruler and chalk marker to get each pattern piece on the straightest grain possible after prewashing indiscriminately. Wash and examine a square, and go from there.
- I learned how the differential feed works on my new serger, and managed to adjust it quite well to the various seams and edges.
- I found a stretch stitch on my machine that makes a great hem - 2 rows of straight stitches with zig-sags between. From a distance it looks kind of like a cover stitch.

I made two changes to the pattern.
- I added 1.5 inches for waist length adding it above the waist at the long seam side, and below the V of the neck on the short seam side of the front, straight across above the waist on the back.
- I added 2" to the sleeve length, and then added a band to the bottom the same width as the front band. This makes the sleeves actuually 3/4. The pattern is far short of a 3/4 sleeve. Also, I think this makes a much nicer sleeve finish than a simple hem.
Pattern Issues:
- There is something odd about the way the side seam at the waist sucks in where the band connects. It is most likely connected to the fact that the fabric is under stress at that point, and would not occur if it were a larger size.
- I don't like the way the back neck is finished, with just a foldover 1/2" stitched down. It looks sloppy, and does not fit as neatly as I hoped at the shoulder edge. It would be nice if the band could be continued over the back neck. Maybe an experiment at some time, but I would hate to mess with the fit of the front in doing something to that nice band.
- In the directions it says to match the notches when sewing on the band. I did not see any notches on the shirt front or the band, but the illustration suggest quartering each, so that's what I did. I think it would make sense to measure and mark the quarters on the pattern, then transfer those makings to the fabric at cutting time. That's my brainwave for now, anyway.


3 comments:
I cut 1" SA on the body and sleeves (I hate tight sleeves) baste the seams and try it on. You have to remember that every knit behaves differently. I've learned the hard way, so I do that on EVERY knit. Sort of a pain but it's saved many a garment from being a wadder!
Thanks Zazzu for your kind comments. I do love red, as long as it is on the blue side.
Thanks Debkb for the suggestion about side seams. It sounds very practical, and I don't know why I didn't do it instinctively with this first-time pattern.
Hopefully one day I will have mastered the mysteries of knits -- at this point it seems experience is is the route to that mastery.
Thanks to both of you for taking trouble to comment.
Betty thanks so much for the detailed information about making up this top. I am planning to sew this too for my SWAP having not sewn knits much before and I'm grateful for all the tips.
Post a Comment