
Spent a few hours this afternoon and evening working on the pants. Before breakfast I topstitched the fly front successfully, using masking tape to mark where the sewing should go. I observed that the following adjustments should be made next time around:
- overlock the raw long edge of the fly before attaching it
- don't forget to interface the fly facing, but more importantly, make the fly long enough to cover the bottom edge of the fly facing. Possibly cut 1/4 inch from the facing all around if it is not to be turned under (ie overlocked instead)
 Seam finishes are important to me, and necessary for polyester. I really dont like the look of non-serger overlocking so I bound these seams with black tricot. I have not mastered the quick and easy way to apply it, but they look ok. Observation from doing that:
- bind the edges of the back and front seams up to the notches BEFORE you sew the seam and BEFORE you put in the fly. Otherwise it is near to impossible to get a neat job.
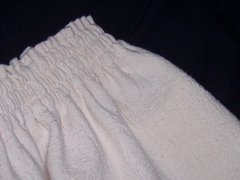
Afterword: This evening I got to the waistband. Discovery #1 was that I had somehow not paid enough attention to which side of the band got interfaced. This is a 3-part fitted waistband, and I had made notes on the pattern to be careful to get the sides lined up right before interfacing. There is an upside down, right-side wrong-side issue. When both sides of the fabric look the same, its possible to cut the bands so they don't match up. Well.....I had interfaced the front bands (which are different from each other) in such a way that they would not fit together with the interfacing on the back band. Not only that....but Dicsovery #2 was that all my efforts to get nice facings and do all that fussy stuff while the bands were unattached, proved to be futile, as there is no way to neatly sew them on in the zipper area with all the corners and edges already done; AND, as if that weren't enough, Discovery #3 was that the 2 layers of this fabric, especially with the grade of interfacing I used, make for a very heavy waistband in which the corners do not shape nicely, Therefore: A repair job will be necessary tomorrow:
More Afterword: (Friday) The waistband idea turned out to be a really bad one, and the pattern directions are definitely preferable, even though fitting at the waist could be tricky. As for elastic in the back, I think there must be a way to do this even by following the pattern directions. The back waistband has a few wrinkles, due I think, to the way I did the seaming 'after the fact'. Nothing too serious, as there will not likely be any tucking in of shirts.
Something to think about for the next pair. For future reference:
- It is necessary to determine any side seam adjustement prior to cutting the waistband, and to cut the band exactly the size of the waistline.
- Finish the edge of the waistband facing so it can be 'stitched in the ditch' instead of being folded under.
- If elastic is going in the back, it will have to be sewed to the interfaced faced band before the facings are turned, or sewed to the facings only.
The vents at the bottom of the legs were challenging - not from a sewing point of view, but from a reading-the-directions point of view. I found them quite unclear fathoming back/front/left/right. Its one of those rotation things I cannot do well in my head. [as plainly can be seen from the waistband issue, which by the way I also messed up in the muslin] In the end, the job was quite easy.
- I think a turned under finish on the front flap might be more attractive than overlock.
Afterword: I let out the waist seam 1/4" on each side and lo, the crotch dropped just that little bit to result in comfort. It also seemed to help the back seam where the waist seems too low.
Time now to leave well enough alone. All that remains is the waistband fiasco, and the hems [which will be interesting around those vents] and fasteners. The side seams are done, pressed and bound, and the
The current pattern adjustment are:
- Use size 16 throughout
- Lower front and back crotch seam about 1/4 inch
- Take in the back inseam about 1/4 inch [flat seat adjustment]
- Take in outside seams at the hip [saddlebag area] about 1/4". I have no idea why this area needs to be taken in. One would think it would be the opposite.
- Add 1/2" to the height of the back seam, tapering to nothing at the darts. Make appropriate adjustments to shape of the waistband.
- Let out the side seams at the waist about 1/4" each side.
- Adjust seams around the hips in the final fitting. There is a tendency to bulge just below the hip.


No comments:
Post a Comment