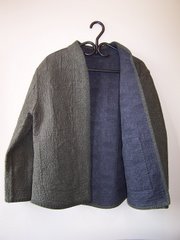
The picture below shows the result, though I can now see it needs a good pressing!!
 My original intention was to make the jacket from red wool crepe, purchased for last year's SWAP, but never used. This green one was supposed to be a wearable muslin, to check out the sizing, then it became a major project in itself.
This garment was fun to sew, but has a bazillion little details that can be a thrill or a pain. The underlying vest is very comfortable, and suggests being used as the base for a jacket, adding sleeves from another pattern.
Process: I traced and pin-fit the pattern, and decided to sew it without any alterations. Usually I would lower the bust and lengthen the torso, but the bust seemed to fit well (besides, it's essentially behind the cape, isn't it?) and I was not too sure about how to lengthen the curved pieces of the cape. In retrospect, I should have stifled my urge to get going and thought this problem through.
So off I went, working with a piece of green faux suede, also bought for my last SWAP and not used. I only had about 1.5m of this stuff, not enough to make the unlined version with wide front facings, so I made the lined option, using a length of quilting cotton I had bought for a shirt. I decided it was too heavy for a comfortable shirt, but it had the exact green in it to match the Fashion Fabric. Killing two stash pieces in one fell swoop!
 The faux suede, which I had not sewn with before, was wonderful to work with, and of course, the cotton was no problem.
The Design: The pattern is essentially a princess seamed vest and the cape portion is seamed into the princess seam at the front.
No project would be complete without a litany of lessons learned and errors made:
- Being long-waisted, I really should have lengthened the whole thing. The belt is designed to come round slightly above the waist, and for me it is several inches above, so not all that comfortable. Lengthening the cape would required some thought, as a drop of 2" would increase the circumference quite a bit. It would be necessary to decide whether to do that, or to change the curve.
- Speaking of the belt: I made it too short (one should always actually measure the part around which the belt goes, then add for what will extend through the buckle). I also used a stiff woven interfacing in the belt. Not sure it was the best idea. I ended up having to add a piece to the center of the belt so it is not a fashion statement in any way. Fortunately it is not visible as it sits under the cape back. Nevertheless, a new belt is in order. Unfortunately, I do not have any fabric left. Every scrap was used.
- There is a lot of topstitching, and for the bit around the hem (the lining is seamed at the edge of the hemline) it might have been wise to baste rather than pin, or use a fusible tape to keep one layer from creeping more than the other around the curve. Since all the topstitching is not done at the same time, keeping track of stitch lengths and width from edge, and thread color is important.
- Working carefully: At the front where the cape joins the front pieces there is a very short of seaming below the slit for the belt. So there is absolutely no room for error in the hem or the placement of the belt slit. Personally, I would have left a bit more there for safety's sake. I had to pick out some stitching there and raise the belt slit a bit to make everything come out neatly. The belt slit starts exactly at the topstitching line around the hem edge. I am not sure what happens here if in the unlined version where the hem is turned up, but you have to leave room for it.
- There are a number of places in this construction where the mind has to conceive things inside out, upside down and backwards. My mind does not do this well. In particular, getting the lining installed was laughable as I struggled to figure out where to sew, what sides together, etc. I believe this is called "bagging" a lining, where the lining is constructed separately from the garment then all sewed in together, turned inside out by hauling through a shoulder seam or someplace equally narrow and inaccessible. There was a lot of scrunching up during this process, but it came out well in the end.
One thing I did right was to leave the final lining seam open until I was sure everything else was properly placed and I did not have to get back inside for anything. (In fact, the final side seam is still open, as I forgot to sew it up when doing the final touches today.) - Interfacing: Without pretesting on a scrap, I interfaced the collar, epaulets and pocket welts with a lightweight woven fusible. The result was pieces that resembled cardboard in their flexibility. (This was part but by no means the most critical factor in ruining the collar.) I was able to redo the shoulder decorations with a thin knit interfacing that left some movement. Otherwise they would not have bent enough to sew them down. I used the welts as they were since they did not require any movement once in place. (You must remember here that I was seriously out of fabric at this point.)
- I ruined the collar at the beginning. No need to go into details, just not paying attention and also using a too-stiff interfacing. I did not have enough fabric to make another, so my collar now matches the lining. This is not a particularly bad thing, just annoying.
- The neckline where the collar attaches is bulky. Both vest and cape join at the collar, so there is a lot of bulk there to deal with. This is in part due to the bulk of the chosen fabrics and collar interfacing. In another incarnation, I would be more careful about clipping and really ponder over the construction methods and fabric choices to try to reduce this.
- Lining with cotton: I chose the cotton lining for its color match to the suede. It is a bit heavy and un-slippery for a lining. I made this choice when I was still viewing this an an experimental garment. For best effect, I think this jacket should be made with collar and lapels made of the main fashion fabric. On the other hand, the cotton adds warmth, and it certainly adds an interesting element to the design.
- I messed up the buttonholes: Buttonholes are not my strong suit. This front has 6 large buttons in a double-breasted style. There are some other little details around the button layout, but I was again not as careful as necessary and misplaced the center buttonhole by 1/4", leaving insufficient space for equally spaced buttons at the top. Though I do not expect to wear this garment with the top closed up to the neck, it would have been nice to have done it right. I need to get over my fear of getting the buttonholes looking good and properly placed. Practice. Practice. Practice.


5 comments:
It's beautiful, Betty! I had the same problem with the belt (too short). I congratulate you on achieving such good results on a very defying project!
Betty, what a good job! You've let the cat out of the bag to us sewists with your review, but no one else will know these trials! This pattern does seem to be quirky! I love the colors on you, also. Are you going to do another in the original color scheme?
I think I may do another cape in red wool crepe. I will make it all one color with front facing and collar also in red wool. I will probably line it, even though the pattern for this version has no lining. For lining I hope to find something wildly colored and silky.
That is beautiful! Thanks for the detailed review - if I had this issue I would definately be sewing one for myself. A red wool crepe would be gorgeous!
Thanks for all your kind comments. I've just discovered "tany's" blog, Coutour et Tricot. Her details about the construction of this cape are amazing, as is her result.
Post a Comment